Sunday, July 29, 2012

Card Swap Registration Closed - Garage Sale Coming Up.

We have nine people signed up for the card swap now.   Registration closed on Saturday, so that means ladies you have to make 9 cards of your choice with some simple guidelines that I've posted again below to remind you.   

Remember to make sure that the card you design and give away is one that you would be thrilled to receive!  Strive for it to be your best work and make sure it is generic enough that the recipient will be able to use it. 

Your cards are to be completed and in the store by August 18th please, ready for distribution August 25th.

The guide lines for this month are simple
-There will be three standard sizes for you to choose from.  They are: 
4 1/4 x 5 1/2  or  5 3/4 square,  or  4 1/2 x 6.  
These will then fit standard envelopes allowing the recipient to be able to mail them.
You don't have to supply the envelope.
-There must be a minimum of two layers to the card.  That is a card base and at least one layer on the front.
-There must be at least one thing used on the card that has been purchased at the Craft Nook.  That could be the stamp, paper, embellishment etc.
Have you signed up for the garage sale yet?  That date is fast coming up, so don't delay.  Go through your stash and find all those things that you no longer love and use, but that someone else would love to have.  It's really easy and you have the opportunity to change your unloved "stuff" into "stuff" you've been aching to have. 
All you do is sort some of your "stuff," bring it into the store, we will display and sell it for you and you receive a gift certificate to purchase some new product for yourself.  Some of the ladies sold up to $100.00 in the last garage sale enabling them to purchase product that had been on their wish lists.

We're going to be up early again tomorrow to watch the Men's Eight Rowing Team compete in the Repechage.  We had of course hoped that they wouldn't have to compete in this race, but then sometimes it's good not to have too long a break between the first heat and the finals. 
We were up at five in the morning to watch the first heat and although Canada's placement wasn't what we would have wanted, once it became apparent that they weren't going to come in first and get the automatic move to the finals, they conserved their energy for the Repechage tomorrow morning.  So our alarm is set for 4:30 am this time to see the heat at 4:50 am.  Many family and friends in Bracebridge and Belleville will all be tuned in at the same time.
Here's a photo of my sister, brother-in-law and nephew's daughter watching the first heat at Dorney in England.  My sister is standing wearing the red Canada shirt.
There were many more family, cousins and aunt, on the other side of the waterway who took this photo.
I've finished my scrapbook page and will scan and show it to you next posting.  Linda's girls finished there tie died T-shirts so they'll be posted for you to see too.  I also have a shadow box frame that my sister made for her sister...oh that would be my sister too...LOL.  Couldn't show it to you before, because it was a surprise for our English sister. 

And now, last but not least, the blog special for this week.  Remember it's available to you from Thursday of this week until Monday of next week.
This time we have STUDIO CALICO-Memoir Collection. This package contains one 6-1/4x5 inch package of die-cut chipboard buttons in assorted shapes sizes. 62 total pieces.
The regular pricing on this item is $5.79.  The Blog Special is just $2.89.  don't delay with this one, because there are a limited number on the shelf, and don't forget to mention to one of us that you saw it on the blog, so that you get the special pricing.


Until later, Happy Crafting
Lilian

Tuesday, July 24, 2012

One More Week to Register

If you are interested in registering for the card swap, registration closes at the end of this week.  Go to the July 17th posting to read all the details.

Did you take the opportunity of the weekly special last week?  Many customers came in and took advantage of it, did you?

Here's this week's special. 

KRYLON-UV Resistant Acrylic Coating in an 11 ounce Aerosol. Matte. This coating provides a permanent, protective coating which protects art, crafts, and valuables against harmful UV light rays. Moisture resistant and smudge proof. Ideal for photography, artwork, painted surfaces, wood, metal, plastic, paper mache, glass, plaster, ceramic, dried/silk flowers, paper, wicker, etc. Non yellowing permanent coating. Dries in minutes
Regularly priced at $11.39..........Sale Price $5.69

Remember the sale starts on Thursday and goes until the following Monday.

I've begun working on another scrapbook page which I'll show you as soon as it's complete.  The start time and the end time often have many interruptions, but I'm pleased with the way it's shaping up so far.

Linda has lots of new items in the newsletter today and hopefully we'll have them all unpacked ready for you today.

The Thursday Technique Class filled up fast this past week, so make sure if you want to register, don't leave it to the week of the class, you'll be disappointed.  The same applies for the Friday Night Crop Night, make sure you register long before the day of the Crop.

We're going to get inky fingers again this week in class as we play some more with the distress inks.  One quick card and two more with a variety of techniques to learn.

Linda and the girl's have been making some fun jewellery I'll post later this week, so drop back for that.

Have you signed up to receive an email that will alert you each time I post a blog?  It's really easy.  Just go to the right side bar, the fourth title bar down says KEEP UP BY EMAIL WITH WHAT'S NEW AT THE CRAFT NOOK.  If you add and submit your email address, you'll get an alert and won't have to keep checking back to the blog.

Elaine is having some beautiful weather for her family camping holiday, but my poor flowers are feeling pretty thirsty without the rain.  Conversely, family in England have been almost drowning in the amount of rain they've been having.  However I received this lovely photo from my sister-in-law and having spoken to my Mother-in-law recently, I understand they've enjoyed a couple of days without rain and in fact with some sunshine!
Let me know if there's anything you would like to hear about in the blog.   I can ramble on for hours, but perhaps there's something you would like to learn?
Until later....Happy Crafting,
Lilian

Sunday, July 22, 2012

Some Promised Jewellery Pieces

I had mentioned that I'd post some of the jewellery that Linda and her girls have been busy making.  They've just finished another one, but I don't have photos for that yet, so will share those with you later.

The first piece is a simple crochet bracelet made from T-Shirt material and light changing beads.  When these beads go out into the daylight they go from white to many different colours.  Being made with T-Shirt material they are easily washable too.


Here's the before
and the after.


Can you see the difference?  The beads went from white to pink.   Children love these as much as they love the glow in the dark gimp.


Linda made a lovely necklace with a donut bead, some chain and waxed cotton cord


I mentioned that I had made a gift for my sister and niece, but couldn't show you at the time as they were still in the mail.  I had a lovely phone call from my sister early this week when she opened her mail to find the two fun necklaces I had made for them to wear when they attend the Olympics next week.
Made from split rings, jump rings, chain and floss, I made them as I travelled last week to enjoy our fun day at Collingwood.
I had forgotten to take a photo as I was anxious to get them in the mail to my sister, but she kindly took and sent these photos to me so that I could share them with you.

  
 I thought you may enjoy this photo of my nephew and one of his team mates.  The long and the short of it (no pun intended) is that there is a huge difference between the coxswain in a boat and a rower.  Here's Brian with Conlin McCabe who comes from Brockville Ontario.  Brian is from Ameliasburg (near Belleville) Ontario.  Brian is about 5'0", Conlin is 6'8".  As I said, the long and the short of it is, that a coxswain and rower are built differently!


Have you looked on the Flickr site at last weeks card class?  The ladies really enjoyed the cards we made that night.   Here's one of their favourites, but click here to see the other two they made also.


Last but not least, we have five registrants for the card swap, but it was brought to my attention by one person that they were concerned they would have time to make enough cards if there was a large registration.  The MOST you will make will be ten.   If it goes beyond that number, for example to eleven or twelve, I will divide them into two groups so you will then only have to make five or six cards.  Hopefully that will alleviate any concerns you may have and you'll want to register.  If you do want to, then scroll down to the July 17th posting, add the next number and your first name and last name initial to the list.  Don't forget to send a confirmation email to the store as well with your last name in the email.  Here's the email address.
Look forward to seeing more of you fabulous cardmakers registering.  There's lots of time to get them made, check the dates on the July 17th posting for registration and submission.

Until later....Happy Crafting

Lilian

Thursday, July 19, 2012

How Do You Start?

That's a question we are often asked by both new and seasoned Scrapbookers, so I thought I'd share with you the steps I go through to prepare and then create a page.

I remember when I first began scrapbooking some twelve years ago and the style then was to take your photos to the paper and choose those that went with the photos.  Then place the photos in a "Z" shape across the pages.   I quickly got bored with that and realised that all my pages were looking the same except for different papers. 

The next step for me was to realise that when I knit or sew, I always have a pattern to follow and with my choice of materials my garments looked unique.  With that realisation in hand I began to follow designs from magazines and my pages took on a different look, but photos tended to be same sizes or cut/cropped so that I lost the content of my photo.

A giant window opened for me when I discovered Becky Fleck's Page Maps.  She is an amazing graphic designer and by using her "maps", every single page is so unique, so many different sized photos, so many ideas on how to make the best use of your paper.....I love it!  However I'm not saying it's only her designs I use now, but she opened the window for me.

So here's where I start. I choose the design and then I like to take it into my photo program to perhaps manipulate it a little to suit me better.   This is my starting map/point.  When you see the finished page, you will see this is simply a jumping off spot for me.
My next step once I've chosen my photos is to take them into the layout.  This gives me a good feel for the placement of the chosen photos.
By this time the photos are sized to fit my layout and I prepare them to send to be printed. 

Because they are varying sizes, I often put more than one into a 4 x 6 photo, such as this one.  Both of these photos fit into one 4x6, so are printed as one photo at the lab with a white background around them.  I simply have to cut around them to separate them.  This is not only cost effective, but has allowed me to reduce the size of the photo without removing the content  which is what happens when you crop it. 

These steps so far will have taken me less time than deciding which photos to use.  Once I've separated all the photos and chosen the paper I'm using, it takes little time to actually put the page together.  When choosing my papers, because I use a number of different papers to a layout, I have no trouble making the colours work with my photos.

So now here's the finished layout.  It's a little different to the original map, with embellishments placed in other areas, but as I said, a map is a jumping off spot for me.  I was quite pleased with the finished result.  Using a photo (at the bottom) for my title was a change and the flower embellishments this time were cut from paper, mounted on punched circles and covered with Glossy Accents to give them the dimensional look of an epoxy embellishment.
Hope this has been helpful for you and maybe caused you to look at the prep work of a layout a little differently too.  If you have any questions, please get in touch and I'll do my best to answer them.

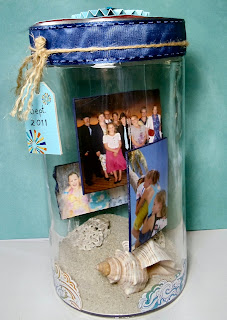
Now one more thing to perhaps inspire you before I go.   This is another way to display some photos in a memorable way  The photos are displayed a jar that have sand and shells from one of the beaches we enjoyed when on our cruise last year. 

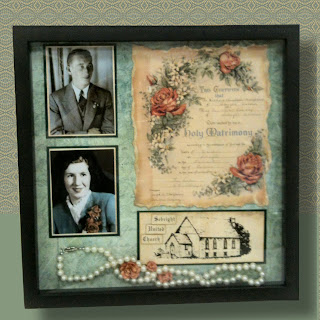
And here, Brenda has displayed her parents wedding photos and marriage certificate in a shadow box.  This takes on a very personal touch when you notice the pearls draped along the bottom of the photo.  They belonged to her mother and were worn on her wedding day.  Another lovely way of displaying photos that have a very special meaning to you.

So I hope you're inspired to preserve your memories in one of the three ways shown above.  As I said, if you need help then drop into the store for a quick answer, or why not sign up for one of our Craft and Crop Nights,  (we have one tomorrow).   That's when Brenda comes to get some help with her projects.  and did I mention she won first place with one of her scrapbook pages at our last crop weekend?  Not this frame, that was completed quite recently, but another beautiful heritage scrapbook page.

I notice that presently we only have one person interested in joining us for a card swap.  I know it's summer and a hot one at that, but surely like me, some of you are still crafting?  If you're sitting on the fence not knowing how to participate, please don't hesitate to get in touch, or scroll down to the July 17th entry and sign up in the comment section.

Until later, Happy Crafting

Lilian

Tuesday, July 17, 2012

WANTED - Creative Card Makers

We are looking for some creative card makers to participate in a card swap.   Is that you?

What is a card swap you ask.  That is where you sign up to the card swap to make one style of card for however many people register.  Clear as mud you say...........hmm..........okay six people register, that means you design and make six of the same style card.  Bring them into the store by a pre-determined date and one week later you can pick up a pack of six cards, one card from each of the registrants for you to take home and use. Ten people register, you make ten of your card design and you go home with one card from each registrant and so on. 
Having committed you will be expected to follow through so as not to disappoint the other registrants.  Without your follow through, they would have to go home with more than one of their own cards.

What's in it for you?  You get one of your own cards back of course, but also you will receive 5-9 cards (or more) that others have made and which will be like an inspirational lesson, perhaps showing you a technique you didn't know of.  Also you don't have to mail them anywhere, so no cost to you there.

There will be some simple guide lines to follow, which may change each month.  Always remember too, that if you agree to participate you need to make sure that the card you design and give away would be one that you would be thrilled to receive!  Always strive for it to be your best work.

The guide lines for this month are simple
-There will be three standard sizes for you to choose from.  They are: 
4 1/4 x 5 1/2  or  5 3/4 square,  or  4 1/2 x 6.  
These will then fit standard envelopes allowing the recipient to be able to mail them.
-There must be a minimum of two layers to the card.  That is a card base and at least one layer on the front.
-There must be at least one thing used on the card that has been purchased at the Craft Nook.  That could be the stamp, paper, embellishment etc.

Now how do you register? 
At the bottom of this blog entry you will see a comment box.  Enter your first name and the initial of your last name ( for me that would be Lilian C ) then send an email to the store here to confirm entry.   There are a number of options to use in the comment box, but the easiest is if you comment as "anonymous"   please make sure however, that you put your name as I indicated in the comment so we know who you are.  
If you are the first registrant please put the number one beside your name.  The second registrant, the number two, so that everyone can see at a glance how many are registered.
Registration is required by July 28th. 
Cards to be in the store by August 18th for pick up August 25th.

Next, Linda mentioned in the newsletter that there would be something else of interest in the blog this week.  

We will be offering one item each week at a ridiculously low price.  We will be calling it the Thrifty Thursday Special.  You will have to ask for the special price at the till when you present the item to let us know that you've seen it in the blog, as the item will not indicate the special price on the sticker.  This special will run from Thursday of the week that it goes into the blog until the following Monday, so you won't want to delay in picking it up each week.  It will go into the blog on the Tuesday, but not be valid until the Thursday of that week.  Don't ask for it before the Thursday as it won't be on special then.

This week's special is for the paper crafters, whether you are a card maker or scrapbooker, this one's for you.  Perfect timing if you are thinking of signing up for the card swap in fact.
Here it is.  Made by SandyLion the pack of stickers has eight different flowers in it.  We recently used this pack for a card class, but altered the flowers slightly to suit our card.

The regular price on this item is $2.39.  For the Thrifty Thursday Special, you can buy it for just $1.19, that's a 50% savings, so don't delay there are limited number and no rain checks.  Remember the Thrifty Thursday Special is valid from this coming Thursday until Monday of next week. 
Also remember to ask for the
Thrifty Thursday Special to receive the special pricing.
  

Here's the card we used this pack of flowers on. 

Notice how we backed one of the flowers with a larger stamped flower.


Well there was a lot to read and take in in the blog today.  If you have any questions, please don't hesitate to call or email us for clarification.   Between the Blog and the Newsletter there are many different dates, so make sure you mark them down on your calendar, daytimer or if you're lucky enough to have a phone that will hold that information, then in the phone.

Card Swap - July 28th registration - in store for August 18th.  Distribution August 25th
Garage Sale - August 11th pre-registration required
Thrifty Thursday Special - every week from Thursday to following Monday

On top of that are the ongoing Card Technique Classes, Friday Night Crop and Craft and the upcoming soon to open for registration Christmas Card Day dates.

Don't forget to pop back later in the week to see the bracelet and tie dying.

Until later - Happy Crafting
Lilian

Thursday, July 12, 2012

Finally Done!

I can't believe how fast the days go by, but I'm finally done putting away all the supplies from Saturday's All Day Card Class....phew!

If you click here you can see the ten cards and three gift tags the ladies created.  By clicking on each display board, you will get a larger view of them too.

It was a busy day of creativity, learning and laughter.   For some who hadn't cardmade for a long time, it was a happy way of jumping back into it.  For those that hadn't cardmade at all in the past it scratched  their interest making them want to sign up for the Christmas Card Making Day,   (I can see that being a rush to register.)

I have some more photos to share with you later of sewing that Emily's been busy doing.  Her Mommy has another craft in mind for her too. 

Rachel has begun to sew her Christmas gifts, so can't show you photos of those unfortunately, that would spoil the surprise for someone.   I  have been making a gift for my sister and niece, but am just dropping them in the mail tomorrow, so can't show you those just yet, but soon. 

Here's something I can share with you though.  The countdown is definitely on now for the Olympics in Great Britain.  A customer was telling me just yesterday that they had seen one of Brian's interviews on a recent news program.  Such a challenge for our family there as they are torn between cheering England on, and rooting for our nephew Brian as he's the coxswain on the mens eight rowing team for Canada. 

My heart went out to the Canadian hurdlers who didn't quite make it to the Olympic team. 

To have trained so hard for so long and miss by mere split seconds can only be said to be heartbreaking, but from the one interview I listened to with Priscilla Lopes-Schliep (on the right above) I was highly impressed by her upbeat attitude and the way she has continued to compete since then as well.  She and her family have given so much in the past year in her efforts to represent Canada and to have that dream disappear in mere seconds must have been hard to get her mind wrapped around.

We have to remember as these athletes train in preparation for their events, family members are often at home holding down the fort and keeping the homefront running.   For my nephew Brian, his wife Robbi juggles the care of two beautiful little girls, Breanna and Peyton, their home and her own business as well.  Having made the decision to compete in these events, Brian and Robbi had to relocate to Vancouver where all the rowing training happens, and therefore Robbi can't call on family to help her manage.   Kudos to all the people in the wings that quietly support and enable our athletes to go on to the Olympics to represent Canada.
Newcomers Gabe Bergen, Jerry Brown, Will Crothers, Doug Csima, Robert Gibson and Conlin McCabe have combined with returnees Malcolm Howard, Andrew Byrnes and coxswain Brian Price to bring the defending Beijing Olympic champion Canadian men’s eight back into medal contention

I changed my mind.  As the blog writer I can do that....LOL!

I decided to show you Emily's recent sewing project.   She began with a felt kit from our store which had the pieces already cut with the floss and needle included.  Emily got busy sewing all the embellishments onto the face and was finished in a snap giving her kitty some character.   A little reminder instruction was required from Gamma to recall how to do the blanket stitch to join the back to the front, but settled comfortably in her bed, she had that step done in no time too.
 
And here's her finished project stuffed and complete..isn't it cute.   I think that the eyes may be further embellished in the future to have them as googlie eyes.  Another great job Emily...well done!

Well I hope you've been inspired once more not only to keep your hands busily crafting in some way, but by the dedication and the dreams of our Canadian Olympians.  How boring life would be with nothing to do or nothing to set our hopes and dreams upon.

Until later...happy crafting,

Lilian


Tuesday, July 10, 2012

Crayon Painting Tutorial

Well as I promised here is the tutorial that Rachel and Emily made to show you just what you can do with a stretch canvas, some crayons and a design of your choice.

The first step was for each of them to choose an image they liked.  A quick search on Google images and Rachel had a fairy sheltering from the rain under a sunflower and Emily found a mermaid sitting on a large rock.  Each design was printed out onto computer paper.

The next step was to create their own transfer.  This was done by making a graphite transfer, scribbling with a pencil on the reverse side of the print over the lines they wanted to transfer.  With the design up to the window, the light made it easier to follow the design.


Step three was to then transfer those graphite lines onto the canvas which we see Emily engaged in doing here.

  And here it is when Rachel had hers completely transferred onto the canvas.


They had already chosen the colours of crayons they wanted to enhance their designs.  Rachel with a variety of blues for the rain.  Emily with purples, mauves and pinks for the coral. 
The next step was to peel the paper off all those crayons.


It was time now to glue their crayons onto the canvas.  This was accomplished with some Scotch quick dry glue and a little patience.  Do you see how their designs go in different directions on the canvas.


Now the fun began with the hair dryer heating and melting the crayons to create the effect of rain and coral.  It meant that they had to be alert to the way the crayons were melting and running down the canvas in order to create the effect they wanted and not run onto their designs either.

The artwork is almost complete now.  All that remains to be done is filling in the design with Permapaque pen in the larger areas and Identipen in the finer areas to give the look of a silhouette.  There were a number of steps to this craft, but taken one by one Rachel and Emily were able to produce some artwork they were very proud of.
Here are the finished results.
              
                  Rain                                                                                  Coral

 
Aren't they lovely!

If you have children who are bored this summer, this is an excellent craft for to keep their hands busy and one which they will be proud to hang up when it's complete.

Thank you to Rachel and Emily for this great photo tutorial and sharing their talent with us.

Watch for the sharing of more ideas soon.

Until later, happy crafting

Lilian

Thursday, July 5, 2012

Hoping all our American Friends had a Happy Fourth of July!

We watched the Boston Pops and the terrific fireworks show they had to offer.  There were a number of phone calls placed by my dear husband as he made sure that all the musical ones in the family knew which channel to turn to.  I think girlies were allowed to stay up a little later to watch the magnificent Boston Pops and the show too. 

I have a real treat coming for you later this week, but not right now.  Linda's girlies made a tutorial to show you the craft they worked on yesterday.  It's a bit photo heavy, but so very worthwhile to see

I'm just going to show you now the promised cards that Linda and I made for Rachel's birthday last Sunday, also the wedding card and gift tag Linda made for her niece recently.
This is the wedding card front and inside that Linda made for Kate.  What you can't see is there is another verse on the inside flap facing the back of the card.  Truly a stunning wedding card don't you agree?
And here we see the gift tag.  We like to make our gift wrapping special so as to be part of the gift, so tend to take extra effort on the appearance of the wrapping too.

 Here you see  the front of the card I made Rachel.  As it was her 13th birthday I wanted the "Wish Big" to be the focal part of her card,  the Spellbinder square cut-out  draws your eye to those words.
She was quite surprised when she opened the card to find all the maple leaves and stars popped right up.  When the card is laid open, they continue to stand upright.

 And now the lovely card Linda made for Rachel.  Don't you love those Sarah Kay stamps!  Linda does such a lovely job of colouring, something I hate to do.  She always does the colouring for any cards that I make for classes when needed.     Linda had a really nice verse inside the card that encouraged Rachel to take time to enjoy her youth and not rush into adulthood. 

Have you signed up yet to make sure you don't miss any postings to the blog?  It's really easy.   Just go to the right sidebar and the fourth green title down says "Keep up by email with what's new at the Craft Nook".  Just type your email address in there and you won't miss any future postings.

Don't forget that if you're waiting for any supplies for Saturday's card class, they will be in on Friday.   We're looking forward to a great day on Saturday with some happy cardmakers in an air conditioned room at the Independent Grocers making more than 220 cards in five hours.

Happy Crafting until next time...

Lilian