Tuesday, April 29, 2014

Did You Hear? It's This Weekend?

What you ask?  National Scrapbook Day.  Saturday is when we will be celebrating with some very special offers for you.


If you receive the Newsletter each week, then by now you will know what items will be on sale. If you don't get the newsletter..why not....no, you can still read it by hopping over to our  Facebook page here

Linda always posts a link to it on a Tuesday morning.

What you won't know until Friday, is the sale pricing of these items, so you'll have to hop back to the blog or Facebook to check them out ready for Saturday morning, when they'll be going on sale.  
There are limited numbers of each of them so be sure to be the early bird so that you don't miss out of the bargains.

Do you ever catch yourself thinking, I'm just like my mother?  As the days turn into a week that's once again flown on by, I find myself thinking, and can hear my mother saying, how time flies.  

Have you  had a productive week this past week.  I had a lot of plans for things I wanted to achieve.  Did a lot of things for others, but right, time flew by and my plans remain as plans for this week perhaps. 
I did decide that I was once again going to work on my Heritage Album, so have picked out 50 patterned papers to have ready to go.  This will be the third time I've made my Heritage Album, I gave the other two away to family members.  Would be shameful not to have one for myself considering my passion wouldn't it!

We had a great time at the Friday Night Crop and Craft Night last week with ladies scrapbooking, card making and learning how to use their newest toy, the Silhouette Portrait.

I've had time this past week though to surf the net and find a lovely new dingbat font.  It's called Border Bits and the lady who created it is kindly sharing with anyone who would like to download it.  The nice thing about it is how, just exactly as the title intimates, you can create borders with your Silhouette cutting machine.  
Not only borders, but with the help of a tutorial I learned how to follow a shape path to create a doily like mat for to use on a scrapbook page or card.  Great font.  You can find it here.

Here's the file I created for you to use, well actually there are two for you. this one I called Lilian Lacey Doily 2 From Border Bits Font. 
   
And here's the other one which I called Lilian Lacey Doily from Border Bits Alpha  


Here's a print screen of my PC when I completed the last step of the second doily. 

Hope they work fine for you, but let me know if they don't.  Make sure you follow the tutorial so that you can learn how to do this also.  

The same lady created 09 Kutups which I've mentioned to you before, but if you don't have it you  can download it here.   Just scroll down below the first three graphics and you'll see the download link.  Be sure to pick up the character map for both fonts so that you know which letter types out which cutting file. 

Are you coming to card class this Thursday?  We have three interesting cards we will be teaching, and kits will be cut today, so don't delay and miss this great opportunity to not only learn, but to socialize with people who love to craft as you do.

I made a Mother's Day card for my dear Mother in law yesterday.  The one I chose to do was modeled on the box card that we made in card class last time.  You can see it here.   The one I've just made is a little different, but quite similar. Hopefully my sister in law can show her how to open and stand it.  They have already celebrated Mothering Sunday in England, but I always send the card in time with our Mother's Day.  Lucky woman methinks that she gets two Mother's days. 


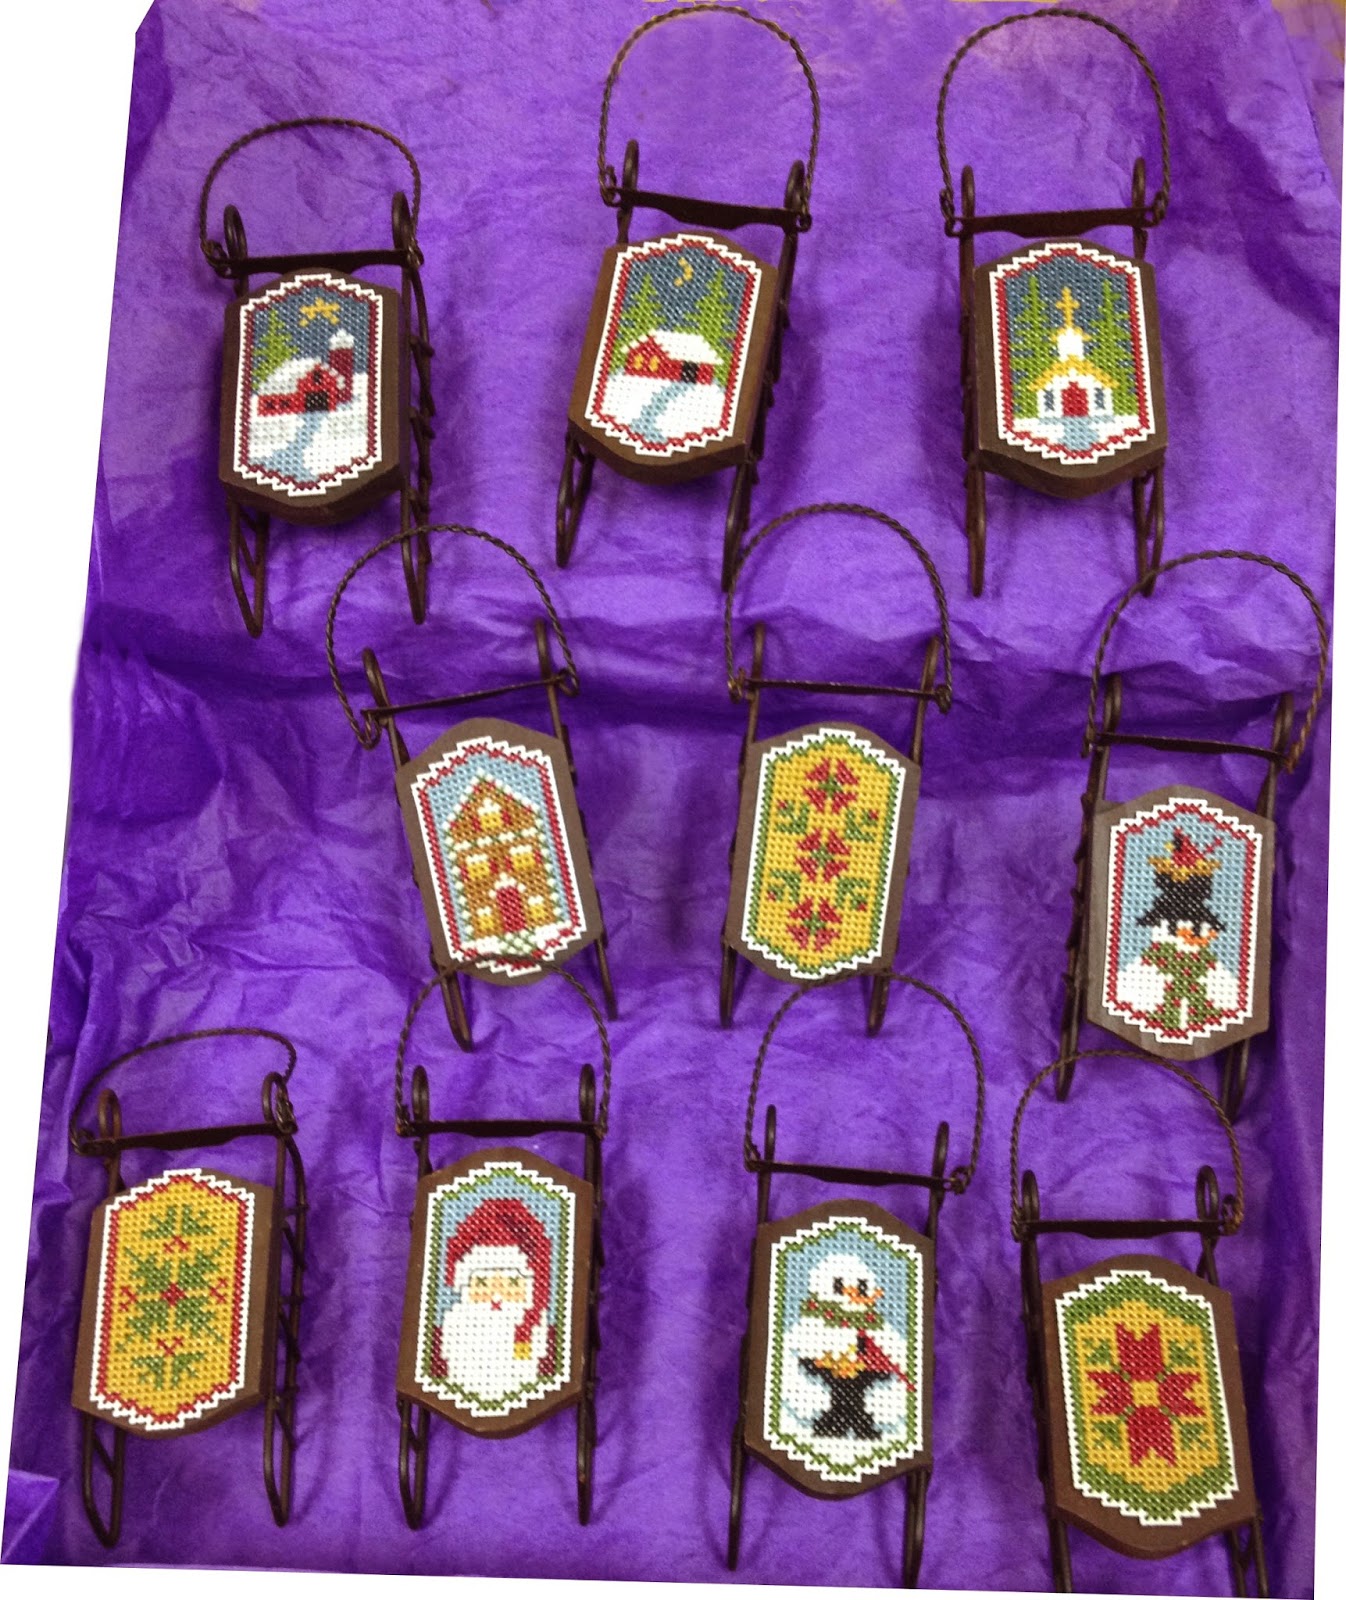
I found two sweet little needlework pieces as I was surfing the crafting blogs I love to look at.  One was from my new favourite site.  She has such lovely pieces and usually small that can be accomplished quite quickly.  This one is a beautiful rose.  Go to Lesley's blog here to get the key and colour chart instructions.

The other one I found was worked on even weave fabric but could easily be worked on aida cloth, if you chose. With the little bead accents and simple embroidery stitches, this would work up really fast.
We sell both aida cloth and the full line of DMC embroidery floss at the store


Have I still not hit on your craft of choice?  What would it be?  Let me know and I'll see what I can find to inspire and motivate you.

Do you love to knit or crochet?  Then Ravelry is the site I would direct you to.  They have so many free patterns you would be knitting morning, noon and night to accomplish just a small portion of them.  Perhaps it's Broomstick Lace that you like, or maybe Tunisian Crochet.  I'm sometimes at a loss to know how I can help or if I can help you craft to your hearts content, so let me know of what you would like to learn and if I can help you achieve your goals.

I told you I would share some more of what was created at the Mega Crop weekend.  The ladies in class worked on six pages and I think I've shown you just two or three so far. Here's another.  I really liked the colours on this one. As a predominantly two page scrapper, I can visualize this easily made into a two page spread.
The clouds were cut from a file we created for the Silhouette machine.  The plain white background cardstock was made more interesting with the use of a toothbrush and some black paint.  We set up a paint booth so that as the ladies spattered their paint it didn't go all over the walls or other's work.


Do you recall we neglected to take photos of two winning pieces.  One we were saved by as Rachel had captured that.  It was Candice's page, which was so loved by Marta that she has recreated with her own photos here.

What a compliment to Candice's work and what a great page too Marta. Thanks for sharing.


The other one we missed was Lisa's.  Lisa made a lovely circular mini album that can be displayed on a coffee table or such.  She kindly brought it into the store through the week so that we could take some photos. Here they are, you see two shots of the album as it's open displaying the pockets that hold memorabilia.  

Lisa has made this beautiful album as an anniversary gift for her parents, so if you know them please don't mention this to them as their anniversary hasn't arrived yet.


This shot shows  it folded quite compactly for all it's elements.


Lisa has kindly dropped off the instructions for this album, so if you're interested in making one yourself, then please get in touch with us for the instructions.
Thank you for sharing this lovely work Lisa.


Well I think that's all I have to share with you this week.
Let me see if I have any words to take you through the week.
We, as you likely do also, know of people facing challenges this week and they are very much in our thoughts.  Though we can't be with them to hold their hands we can uplift them in thought and prayer.
In thinking that, it brought to my mind a conversation I had with a customer in the store this past week.

She shared with me a thought that someone had shared with her.  It was this. That we should be grateful not only for what we have, but what we don't have.
Sometimes that takes a bit of wrapping one's mind around the thought, but there are many things in life that we'd rather not have aren't there?

So with that in mind, I took one of the word files Ginger's House puts out and modified it a little by adding the last two lines to reflect that thought.


Until Later....Happy Crafting,

Lilian
PS.  Don't forget to check the blog and facebook on Friday to learn more about Saturday's sale.

Monday, April 21, 2014

I Think it Has...I Think Spring Has Finally Sprung!

I can see bulbs coming up and lots more birds around.  Though we still have a foot or more of snow in some places, I do believe Spring has sprung.  On the down side, that means all the winter debris to be cleaned up...Yikes...ah well, you can't have it all can you.
So what have you been up to this past week? 
We had a lovely Technique Card Class on Thursday last week. 
The ladies were thrilled to learn how to make a card that we'd actually been holding ready for weeks now waiting for the arrival of spring. Gave up on that and taught it on Thursday.  Maybe that was what heralded Spring do you think?
We showed them how easy it was to make a box card which looks more complicated than it is and in fact for all it's appearance fits a standard envelope.
It is a little time consuming to decorate but well worth the final effect. 
To that end we only made two cards on Thursday.  


Look at the two beautiful box cards Linda went on to make for her girlies ready for Easter.

We chose to make this card to fit into a 6 x 6 ready made envelope.  You could easily adjust the measurements to make a smaller card to fit into a 4.5 x 5.75 envelope, both sizes we sell at the store.


The other option is to score them as horizontal cards giving another totally different look.
Can you see how this style of card would be great to give as a birthday or bridal shower as well as a special anniversary card.  In fact the giving is only limited by ones imagination isn't it.


We also show here how the card lays flat for mailing purposes.  Careful placement of the embellishments keep them within the outer edges of the folded card.


Our  other card was with my much loved Distress Inks. 
Through a number of simple steps, we changed a white piece of card into a piece of art work interesting enough for framing even. 
We heat embossed an image, coloured the cardstock with four colours of ink, part stamped a second generation script image, then splashed the whole piece with water droplets.  
We also used just a portion of a Nestability Die, Labels Eight, to place the greeting at the bottom.  
What do you think? Can't you see this framed and hanging on a wall as a piece of artwork? Minus the greeting of course.


I worked on a scrapbook page for myself this past week. 
Taking a sketch as the starting point, this is what I came up with.


I kept pretty much to the sketch, deviating slightly with the embellishments at the top right corner.  I placed them closer to the right than the sketch suggestion. Also I chose not to add the embellishments on the right edge.
After first making the cut files, I cut the clouds and the sun beams with my Silhouette Cameo,  then detailed  the clouds with pen lines.
The small photo, which though you can't see it well here, showed the few minutes of rain that fell, and was mounted onto chipboard to give it some dimension.


The bottom left corner you see a chipboard square with the month on it which suited the colour of the paper well.  

I cut into the purple flower of the paper and using Stickles detailed the flower petals and inside as well as adding a pearl to the centre.  I then pushed the square under the cut flower and placed more flowers on the top.
You can also see where I punched holes in the border piece, glued purple cardstock behind the holes and filled them with Glossy Accents.


The travel word was again a chipboard piece that I had, but too large for my space so I cut it down to fit.


Here you see some Stickles on the centre of the flower
The faux stitched piece,  is actually the bar coded edge that I cut off the background paper. I liked how it added interest to this part of the layout.


The final detail I wanted to show you was where I placed some pearls over the printed flowers at the centre top of the layout.  Once again adding dimension to the layout.


Here's a copy of the sketch that I used.  
The original sketch came from Julie Johnson's blog a long time ago now.
I challenge you to see what you can do with the same sketch this week. 


I guarantee with your choice of papers and embellishments it will look different to both mine and Julie's. 
Why don't you give it a try and show us your layout?


Remember that I told you we failed to get photos of  two winning layouts at the Mega Crop weekend? Well what we didn't know was that Rachel had taken a photo of the one for her Aunty Marta, so here it is.
This layout was made by Candice and it was for the Embellishment Challenge.
So her layout was required to have certain elements on it such as a handmade flower, stitching in the title, and a frame to name a few.
What a lovely beach layout she put together didn't she.   If you click here, and scroll down to the Mickey Sailing layout (five photos down) that Linda made, you will see her interpretation of the Embellishment Challenge.

So we are only missing Lisa's layout now and hopefully she will have a photo of it that we can share with you later.

Here's another of the class layouts that twenty of the ladies made that weekend.  Did you see the one I already posted on Facebook here?   
You may remember that we taught six one page layouts in that one and a half hour class.  
This is layout two, where they ladies used some puncinello ribbon to create the random dots across the paper. 
The triangles were cut from the paper and contrasting paper added to the back of the layout for further dimension. 
The arrow strip at top and bottom of the page were accented with a pen line through the centre and dots at each point of the arrows to resemble a stitched line.

Hop back over to our Facebook page and you'll see another layout from the class.

I was sorting out two closets on the weekend and came across some knitting that I'd started ages ago.  
It's a child's cardigan and I'd completed the back and almost one front before for whatever reason it was put away.  I loved the pattern when I looked at it again, but didn't know which pattern book I'd taken it from!  I did find it though and finished the front last night, so only one more front and the two sleeves to go.
Hopefully it doesn't get put away again!  I had to join on some new yarn though to complete the front and I use the Russian join method and wondered if the knitters in our midst knew how to do that.  I believe I have mentioned it before some time ago, but a good tip is always worth another mention isn't it. This method saves going back to sew in all those ends when you've finished.  All you have to do is basically darn the two ends together before you simply knit them into your work.  There's a link here to show you how.


Here's a cute little knitted Summer shrug too that's available free for your personal use for a short time, so go get it here soon if you like it. 


I think that's all I have for you this week. Don't forget to try the scrapbook layout I challenged you to.  
Share your take on the same sketch.

Have you signed up to join us on Friday for the Crop and Craft Night.
For only $10 for five hours, you get not only to share time with others who love to craft, be it paper crafting, needlework, or jewelry making, but you also get the opportunity to ask us to teach you a new technique or craft.  So drop in, phone or email to reserve your spot this coming Friday April 25th.

And words for the upcoming week......


in fact...
~
Happy looks good on everyone, so why not pass on a smile or two to the next person you meet.

Until later, Happy Crafting.....

Lilian


Monday, April 14, 2014

Was Your Weekend as Great as Ours?

Because ours that we shared with 32 lovely ladies was full of conversation, creativity and pleasure.
If you've ever wondered how much noise 32 women in a room can make, then you really should drop into one of our Mega Crop Weekends. Heads are down creating and there's not much noise.  That doesn't mean there's none, because a lot of laughter can be heard, as well as social interaction, but believe me it's quiet.

All the planning that went in to the event paid off and we sailed along smoothly, in the classroom main hall and kitchen too.  The menu's were well received and no-one went hungry either.

The pages and cards that were turned out were just beautiful, though we failed at the end to take some photos.  Can you imagine I asked the ladies to hold out their pages so that we could take photos after announcing the winners, then totally gapped on that!  We do have some photos to share though over the next couple of weeks.


Here's the sketch sample that Linda created for everyone to see and follow with their own interpretation.
Some of the ladies even used different sized photos while still following the overall sketch.


And this was the page that was voted to win, created by Suzanne.


With the bold choice of colours and beautiful photos, you can see why her peers liked it.

Not everyone that attended the Mega Crop was an experienced paper crafter.  We had a couple of ladies that were quite new to the craft.  That's where the "make and takes" that we prepare can be useful to them.

This is an opportunity for them to learn a couple of techniques, going on to use those techniques on a page or a card.

What we showed them this time was a how to stamp using some easily obtained, but unusual product as the stamp.
Also how folding your paper in an origami type fold, can create an interesting embellishment to your page, as well as simple scoring and folding to create a ribbon like border.  

Though they didn't actually make it, we showed them the technique of taking a scalloped circle, cutting a spiral into it resulting in a handmade flower.

To the top right of this sample, you will see how circles were created using distress ink, the inside of a toilet roll or paper towel roll along with a smaller bead vial.  These were dipped into Distress Ink and then stamped onto the page.  
The lower right shows lovely uniform dots in two colours.  This was achieved using a metallic ribbon product called Puncinello.  Placing the puncinello ribbon over the cardstock and using a foam dauber and two colours of ink this pattern was created.
Starting with a square piece of patterned paper and folding the sides in, the square took on a different shape. Do this thirteen times and you too will have an embellishment that looks like ours did on the left of the page.
The ribbon like embellishment down the centre came about after scoring and folding two lengths of cardstock and gluing it down.  This was more challenging as of course the scoring wanted to spring back up.


Here's a close up of the page and the various elements.
See the scalloped purple flower that was created from a Spellbinder die with the spiral cut through into the middle.


Here's Linda's sample page for the Embellishment challenge, using some of these techniques.
Anyone who entered this challenge was required to have stitching in their title, a handmade flower, a frame and an altered pearl or bling embellishment. Linda altered the centre pearls of her flowers using a Permanent Sharpie marker.

If you look at the dotted paper in the top half of this sample, you will see that Linda used the metallic ribbon to create her own paper strips. 
Wanting to add journaling in a wave was a challenge in itself as neither one of us was sure how to create it.  That was a learning curve (no pun intended) as Linda learned about "paths" within her publishing program.
Certainly added a nice effect to the page though didn't it.

Lots of mini lessons were given throughout the weekend as Silhouette owners found out how much more their machines could do for them.
Not only owners either. Marta loved that Linda created an eagle for one of her pages, and lots of palm trees too.


By going out on the Internet, finding some clip art of an eagle and palm tree in a very short time Linda created cut files for both of these embellishments.

I created a cut file for Carrie by using a single flourish multiplying and welding it so that she could use it as a background on one of her cards. By simply emailing this to Carrie once it was created, she now has it stored in her library of Silhouette files.

Hop on over to our Facebook page to see one of the class pages that twenty of the ladies made.

And now for the ladies that aren't into the paper crafting here's something that may interest you.

Linda had the pleasure of some "show and tell" in the store last week.  
One of our customers, Margaret, brought some really lovely cross stitching in to show us.
Worked on perforated paper, so that's pretty fine work and then mounted into small wooden sleighs they make a lovely little wall hanging.

Margaret sells these at the Bala craft sale, so if you happen to be there during the sale time, look out for these.  At only ten dollars, they really are a steal.


I found this lovely Easter cross stitch. Though it's only small I'd be pretty amazed if you could get it worked for this Easter.  


You can go here to get the design and colour chart for your personal use.
If you scroll down the left side of her blog, she also offers a number of other designs for you to pick up.


Are you a knitter and a little confused on how to increase?  There are a number of ways to increase stitches.
Some are decorative leaving a hole perhaps and others simply to widen your work and you don't want to leave a hole there.

Here's a great resource to help you figure it out.
They also have a link where they show you how to decrease too.  
Well worth a moment of a knitters time.

That's all for this week folks.  Don't forget to hop over to our Facebook
page to see one of the class samples.

Are you one of those people that likes to feel organised, knowing where you're heading, the time frame you have planned?
Perhaps planning for the week, month or even year ahead and then, .....suddenly life throws a curve ball at your plans.


This week's words are chosen for all of you that life has thrown a curve ball at.

Let go of your plans, and follow these words.


Until Later....Happy Crafting

Lilian

Monday, April 7, 2014

Yep...I Did!


I told a customer to get out of the store!  

Well, yes she knew I was joking, but she was working on a winter project when I had just said ....... NO MORE WINTER in my world.

Yes, of course I got over myself and helped her with the supplies for her project.


Linda and I have been working really hard this past week on the final preparations for the Mega Crop. Hope you are too if you're coming?  Remember it's only three more sleeps before the Mega Crop.
I know a few people have been in the store getting their own personal kits together.  Such a good way to be organised so that you don't have to drag all your "stuff" to the crop. If nothing else, make sure you have a plan to get started on Friday night.  I hate to see those hours go wasted as some people cull through their layouts and photos.  Just decide for sure which one layout you will begin with to "get in the zone".
Don't forget however, if you're bringing an electronic cutting machine bring along an extension cord, because we can't guarantee you will be close to an outlet.

For those taking the class if you want to have with you the appropriately sized photos to complete the pages, here are the sizes Linda used in her layouts.

Layout # 1:- Three - 2.5 x 2.75 (vertical)     
Layout # 2:- One - 5 x 7 (vertical)
Layout # 3:- One - 4 x 5 (vertical)                       
Layout # 4:- One - 2.75 x 4 (vertical)               
                      One - 2.75 x 4 (horizontal)                               
Layout # 5:- One - 4 x 6 (vertical)
                      One - 3 x 4 (vertical)
Layout # 6:- One - 3 x 4 (vertical
                      One - 3.25 x 2.5 (horizontal)
                      One - 2 x 3 (vertical)


It would seem that there are many people knitting these days. Lots of people have been in the store buying yarn. 
With some, it's their first project and they have a friend helping them to learn.  
With others, although they've been knitting for a long time, the pattern they are working on is intricate and they need some help. 

Whatever your skill level, drop in to see us if you need a helping hand.

My sister-in-law has been busy knitting for a sale that she will be in shortly. No you can't attend it unless you're in England in the next short while. 
Here's one of the toddler sweaters she's been knitting. Pretty nice with the hood on it as well isn't it.


We had our second Spring All Day Card Class on Saturday. (Did you see the weather again?  Not at all Spring like) With a smaller group of ladies this time, we held it very successfully at the store.  They all completed their cards and again their favourite card was the same one that the ladies in the first class chose.  It's this one right here.

Using the stamp block as a stamp they created their own unique background for the Queen Anne's Lace stamp to sit on.

Don't forget this is just one of the ten cards that all these ladies made.  You can see the other's on our Flickr site here.


We had a lovely email from Lynda who was a participant in the first Spring All Day Card Class. She has made some Easter ATC's using the same technique. You can see in the centre card how she recreated the technique exactly, whereas with the card to the right she dragged the block to create a different effect.  

Nicely done Lynda and thanks so much for sharing.
Sharing in this way can inspire another crafter to different heights.


I was pleased to see Ronna in the store this week and let her know how her layout that she shared last week, had inspired at least two other crafters
One of them asked me how she had created the paint splat on the layout.  
I told her that I was reasonably sure that it was cut with her Silhouette cutting machine and the image would have come from the Silhouette online store. Ronna confirmed this for me when I saw her. 
Take another look here at her layout.  Just scroll down a little to see it.


Here's another layout that we were privileged to see last week.  This one created by Edie, and my goodness she stretched herself well to make the sketch her very own. Going from the chosen sketch to this layout.


The sketch Edie took her inspiration from was in fact only a one page layout.  
Her other challenge is that she has a hard time leaving photos off her layouts, so what we saw in the planning stages was different again to the end result.

Edie wanted a double page so she had to be creative as she had, as I mentioned, chosen a single page layout.  
I do like the way the arrows travel across from one page to the other taking your eye to the subtitle at the same time.
The sunny colours of the banners on the left page are picked up again by the tab on the right page.  Take a close look at the word tag on the right page and let me know if you figure out where she got that from.
Nicely done Edie, and thanks for sharing your talent.


Easter is almost upon us now, but if you have a little time and like to sew, then perhaps this project is for you?

Kata who blogged these lovely little chicks has kindly shared the pattern as well. Hop on over and grab it for yourself.


They are very similar to the "brood" I made last year that you can see here.
Although mine are a little different to Kata's as you will see when you hop over.  There's also a link there to the pattern that I used for mine.

Don't forget all the supplies for these little chicks can be bought at the Craft Nook.  Felt in a variety of colours, embroidery floss, needles and stuffing.

I don't know how many readers would have known that International Women's Day is celebrated on March 8th each year.  
Yes I know that's a month ago, but I've been thinking this week about some of the women that I have the pleasure of knowing, who have taught me much about grace under pressure.  
Whatever their walk in life may be, I've witnessed their amazing strength, resilience and fortitude. 

So here's a shout out to some of those ladies ........... Nikki, Martha, Katie, Pauline, Christine, Jill, and Becky. 
Thank you for who you are and the lessons you  teach daily through your strength, laughter and passion for life.

With these women in mind, my words for the week are these......


Until Later.....Happy Crafting,

Lilian

Tuesday, April 1, 2014

No, It's Not a Joke. Finally Spring Has Sprung!

At least it has in my world and I'm not letting Old Man Winter back in this year.  Though I haven't quite put away my winter jacket and boots, I am going out more often in my spring jacket.  How about you?

Though I don't have much to show you, it's been a busy week as we work toward the second All Day Card Class on Saturday. I also heard through the grapevine that Barb was in today making up her personal kits for the Mega Crop Weekend, so that's coming really soon too.
Linda and I spent a couple of days last week cutting kits for the 20+ people taking the class  of the 32 attending the weekend.  We haven't finished yet, but we're well on the way.

So what do I have to show you?  

Well Ronna kindly sent us a photo of a layout she's just completed. She was in the store on Friday looking for brick paper.  We had some but it was predominantly red and not what Ronna had in mind.  
I suggested the paper that we used on one of the cards at the last Technique Thursday Class. It really was more of a barn board, but with a little imaginative suggestion from us, Ronna was able to make it into the brick paper she wanted for her layout.


Here's what the original paper looked like.  

It's made by Chickaniddy Crafts from their "Date Night" line and called "Backwoods Lovin".


This is how we made it into a garden fence
Using a wood-grain stamp, Walnut Distress Ink to enhance the grain. A black Permopaque Pen created shadow between the boards and also created nail heads.


And here's how Ronna made it into a brick wall.
Using a black pen to make the mortar joints it did exactly what she needed for her layout.


Great use and differences from the same patterned paper.

 Thanks for sharing Ronna.


It's always interesting in the store to see trends happening.  
Last week I had a couple of people asking about chalk paint.  It has become a very popular choice of paint to use on furniture re-do's, but can be hard to come by and expensive too.  
I came across the "recipe" for making your own chalk paint and thought I'd share it with you.  It's very simple to make and if you aren't needing too much then you can use one or two of the small bottles of Delta Ceramcoat paint that we carry in the store. 

We also carry the Plaster of Paris that is one of the key ingredients to chalk paint

Here's the link to the recipe.

Here's another link to some furniture renovations, it may inspire you to alter a piece of furniture you already have.


I came across some great Ding Bat Fonts too for all the lucky owners of a Silhouette Cutting Machine. When you install these fonts, (put them in your main font folder)  your machine will cut out the appropriate graphic associated with the keyboard letter.  This one I may well have shared with you in the past and it cuts all kinds of different shapes.  Circles, Scalloped Circles, Rectangles, and Ovals to name a few.  It's called 09 Kutups and can be found here.  Make sure you print out the "key" as well so you know which letter makes which shape.


Another that cuts a variety of different bicycles if you should ever have need for that type of embellishment on your page.  
You'll find it here, it's called Sepeda.
Here's a sampling of the font. 


The third font cuts many different flowers that you're sure to get some use from.  It too is a Dafont.com file and I safely downloaded it to my computer a long time ago.   
Click here to download Saru's Flower Ding Bat font.

Remember to print out the "key" or "legend" for each of these fonts, so you aren't guessing which letter is which.  

Do you have a favourite font that you like to use for your journaling, not necessarily a Ding Bat font that you'd like to share?

The other day I was browsing Google Images looking for some Crewel Embroidery patterns.  I came across one, though the link was broken so I don't know who to give credit to. 

It made me think of these felt coasters I made last year for my Mother in law.  These coasters were made with felt and embellished with embroidery floss.  Both available at the Craft Nook.


Crewel work is usually worked on a linen cloth with crewel yarn or even knitting yarn.  Here's the Crewel work that I fell in love with and will have to re-create some day.  


A very talented artistic piece of work, wouldn't you agree?  I think the cutwork that creates the sheep's coat, could be a stitch called Turkey Work embroidery.  I found a video tutorial here for this stitch if you'd like to explore it.  
This lady also has many video tutorials for embroidery stitches here.   Well worth a look.


And for our knitters.  I came across this lovely men's cable sweater on Ravelry. It's a free pattern and although there is the time taken to work the cables, the end result would be well worth the effort don't you think?  This could also be adapted for a ladies sweater just by working the buttonholes on the right hand side of the button band.

If you love to knit or crochet you should take the time to look at Ravelry and set yourself up with a free account.  
There are so many patterns available it's amazing.  Many of them are free for you to download.

There are also forums and groups you can post to if you're looking for something specific, or if you simply need some help.

A great resource.  Keep in mind that although we don't carry a huge assortment of yarn in stock, we can order  Patons, Bernat, Caron, Red Heart, Premier/Deborah Norville, Mary Maxim, to name just a few. Plan your next project, and tell us what you would like to have ordered in for you.  A short lead time is all we require.

And something to think about.  Last Sunday was Mothering Sunday in England and into my inbox came these words. Though we haven't yet celebrated our Mothers Day, I thought they were appropriate for all Mothers or indeed for any woman who has children looking to them for guidance.   


Until Later....Happy Crafting

Lilian