Friday, July 29, 2011

Fun Filled Class

What a great fun filled class we had last nightTammy will tell you she not only learned a few new techniques, but she also learned some new English words! 
She had the dubious pleasure of sitting at a table with her friend Liz and my sister-in-law Di.  Now put two English ladies together and they obviously speak English....makes sense right?  So when one asks Tammy to pass the Cellotape, how is she to know they mean the Scotch Tape?  Or to put this in the rubbish for them, well of course that's the garbage.  Wouldn't you have liked to have been a fly on the table there as Tammy worked at deciphering what on earth they were talking about.

Then at the other end of the table, we had the great pleasure of having some cottagers join our class this week.  As vacationing cottagers they didn't have much in the way of cardmaking tools with them, but with a Tombow glue runner and some borrowed tools they too shared many laughs with us.  Dawn was very happy to have learned a few new techniques last night and Marg enjoyed time with her daughter as they crafted together.  Not only that, in learning how to use the cropadile tool at class, Marg will now be able to use hers at home too, bonus!

As always our all important hometown ladies were there helping others as they learned how to negotiate the Cuttlebug and Spellbinder tools and folders.  If you weren't there, then you missed a laughter filled evening. 
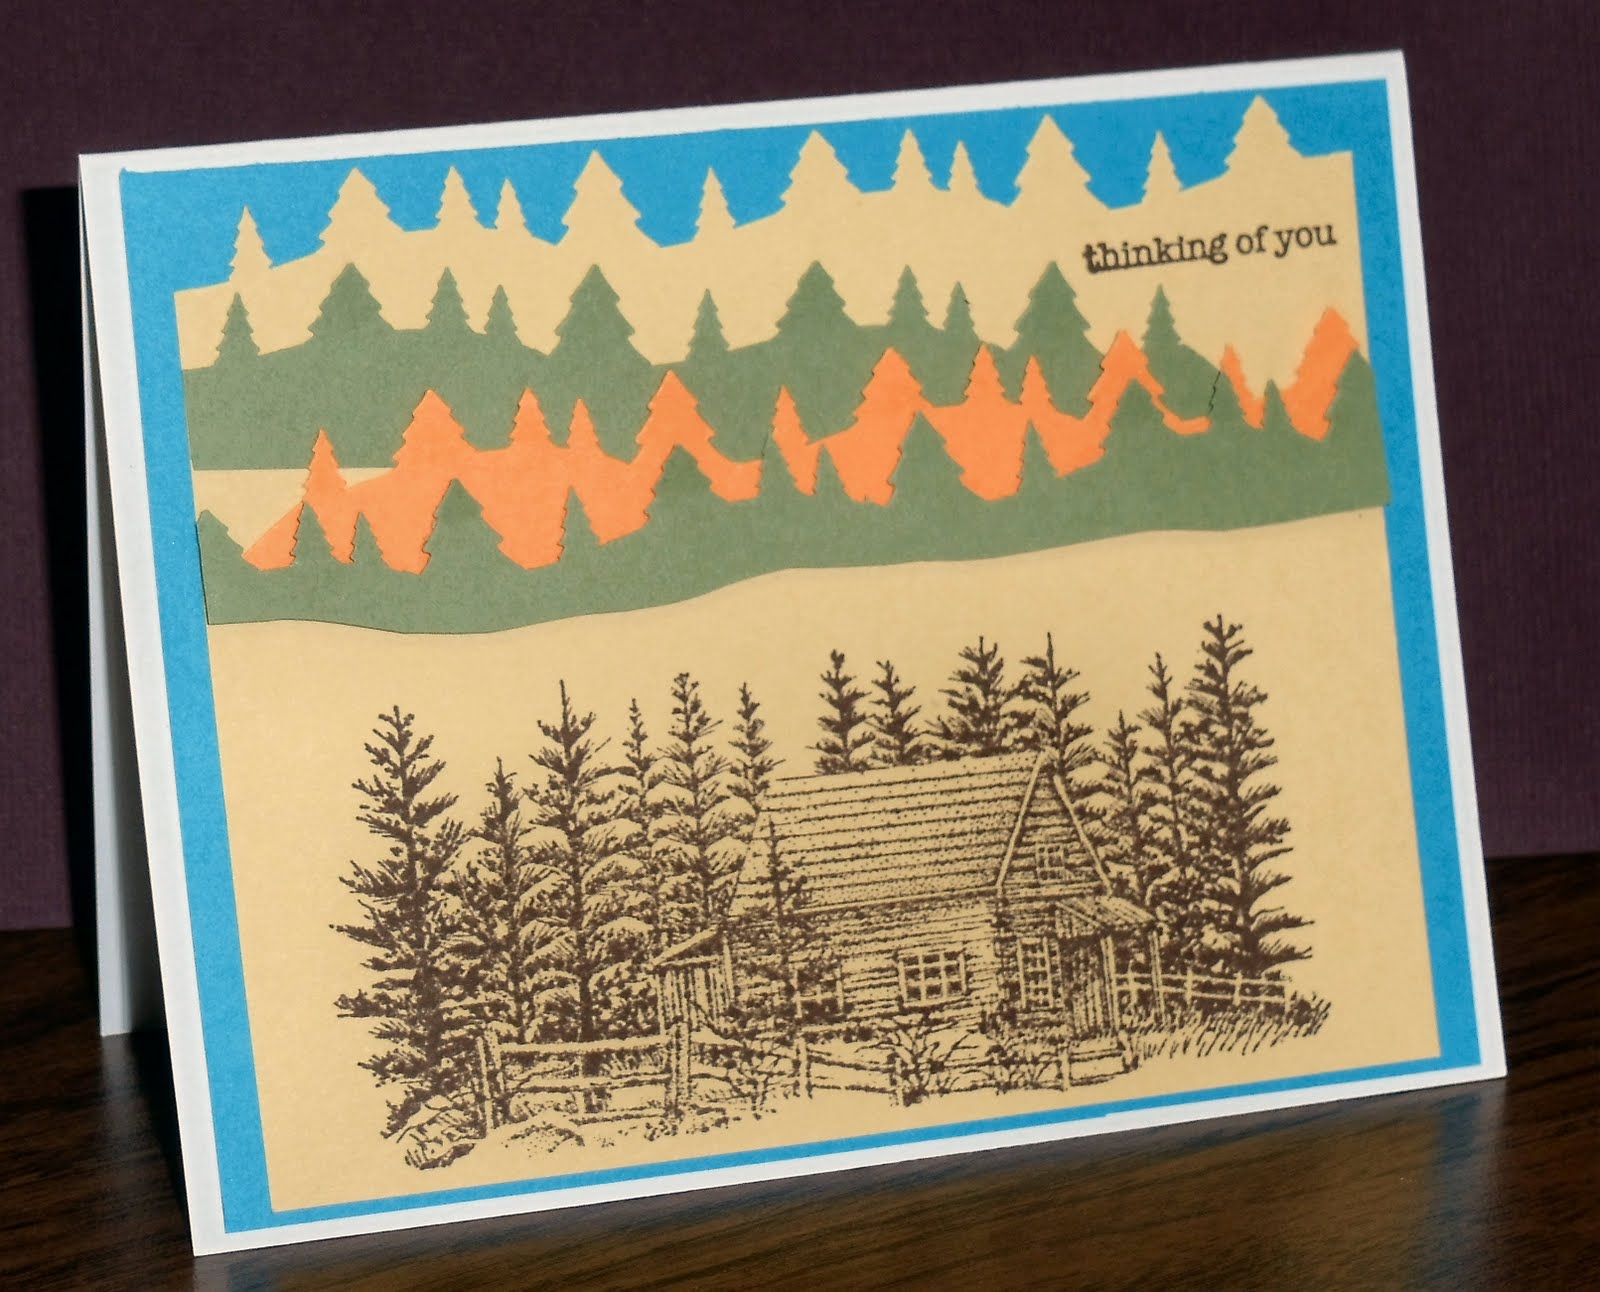
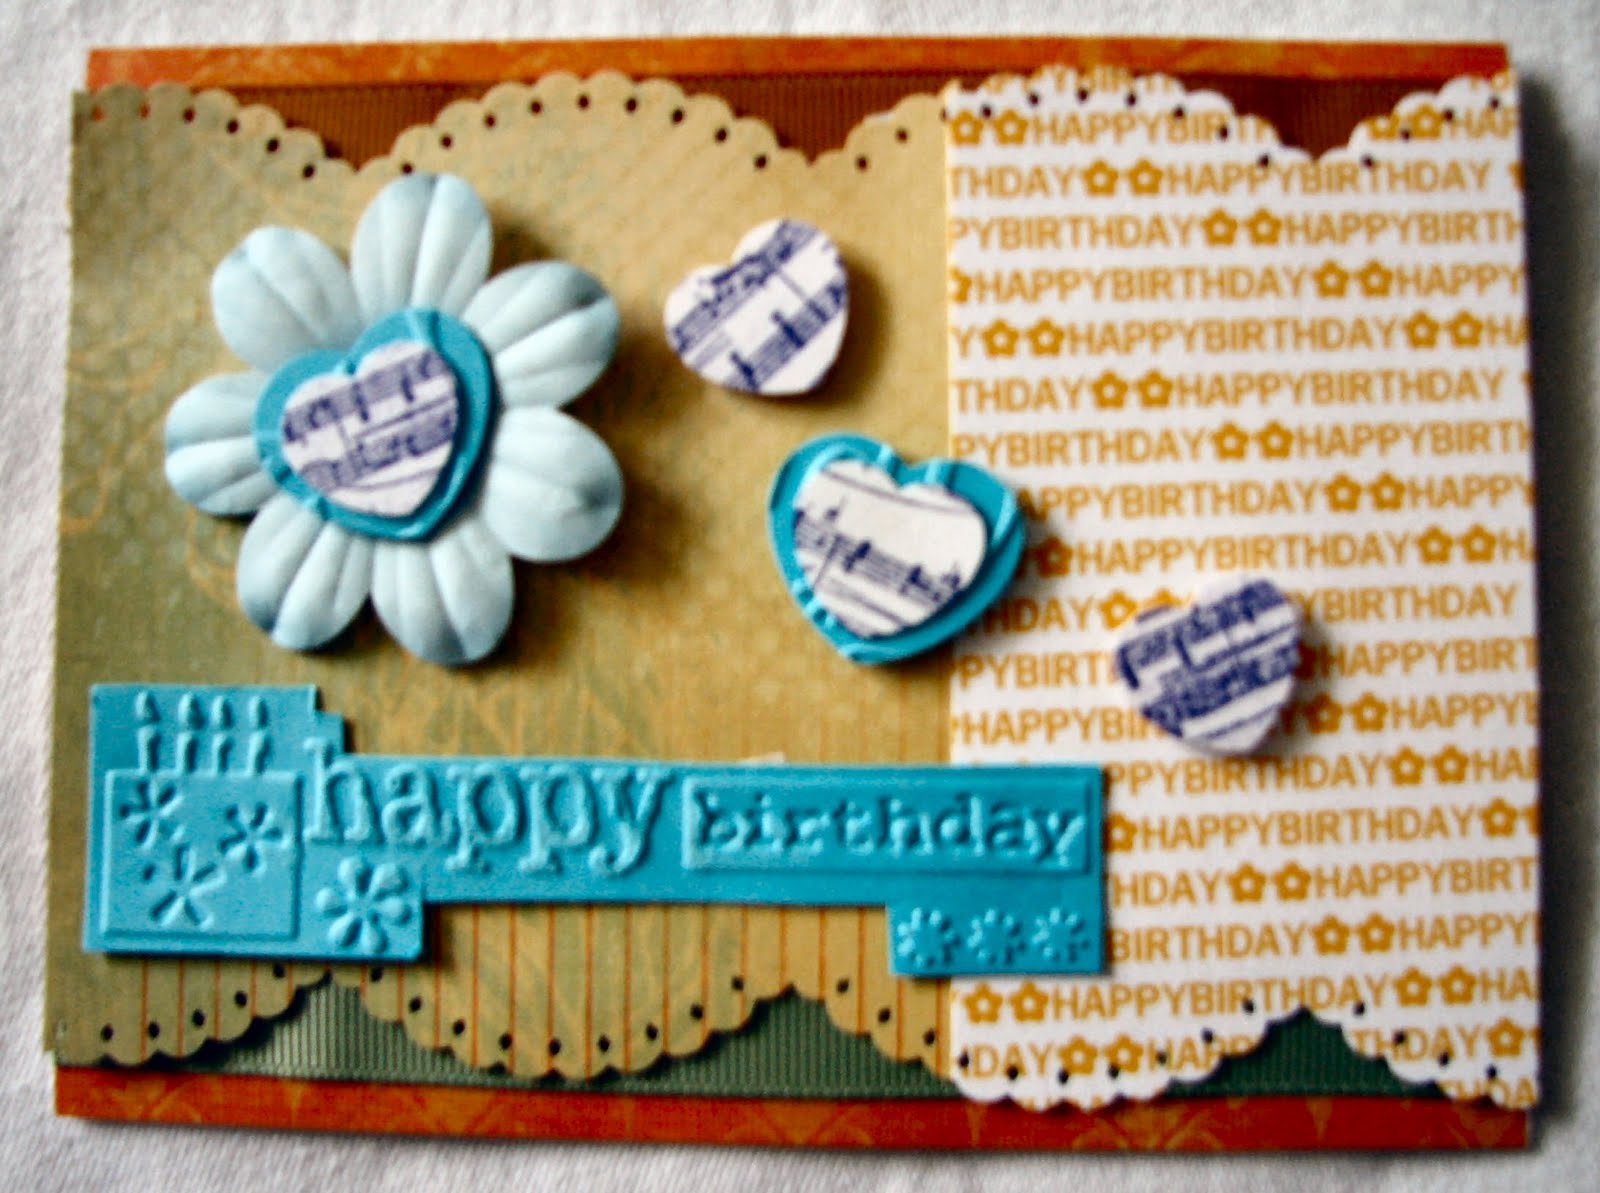
Here's one of the cards they made last night. 
I call it my Happy Card, because looking at it makes me smile.

 
Click here for a peek at all the cards they made

Some of the techniques we played with were;
-tabs
-eyelet setting with a Cropadile
-faux stitching
-handmade stamp
-background stamping
-kiss stamping
-embossing across a 6" paper
-distress inking
-and lots of other tricks & tips that just don't have a name!

Our next card class is in two weeks, make sure you're signed up for it.

Lilian

Thursday, July 28, 2011

Just a Quick Post Today

Elaine mentioned at last Friday Night Crop,  that she'd like to learn how to crochet the little flower embellishments that are so popular on cards and scrapbook pages right now.  They look great on any hat you may knit or crochet too.  Whilst surfing the net, I came upon this little gem (Click HERE) and thought I'd post it for all to learn from and as it's a You Tube video, it's great for the visual learner too.

An update on what I've been doing with my sister-in-law.  We now have the wedding invitations for her son's wedding created, at least we have 24 done another 50-75 to do, but the back is broken on those, and they're lovely, simple but lovely in their simplicity.  Thank heavens for the Cuttlebug!   I'll see if I can get the okay to show you a photo of them later.   Getting past the designing stage and the mechanics of cutting are the biggest thing. We are now working on the table favours.  There are 120 small bags to be sewn.  We have them all cut and are about halfway through the sewing.  Then it will be putting ribbon through the casing to make them into little drawstring bags and they are done.  

Now let me tell you about the tags.  I showed you a photo of the 100 we stamped for the "Wishes Tree".  No that wasn't all of them!  We went on to ink the edges of both sides of another 120  (does that make 440 tags inked  now?)  ready for the bride's father to write the guests names on in caligraphy.  These tags will be tied onto the drawstring bags for the tables.  I'm telling you, Tim Holtz and his tags have nothing on us! 
We are without doubt the QUEENS of tags!

All this creativity goes back and forth via internet for the bride's approval before we move to the next step.  Given the five hour time difference that takes a little bit of creativity in itself.
In between times we've been working on photos and layouts for an album leading up to the wedding.
 
However I have been into the store a few days....Linda's been really busy with the new Dione beads she ordered.  Have you seen them? 
They really are beautiful.
Tonight is card class and we have three lovely cards for the students signed up for that.  Hope you're having as much fun crafting as I am.
Lilian

Wednesday, July 20, 2011

How Are You Faring In This Heat?

Tomorrow is supposed to be really hot and muggy, so are you prepared?  Lots of product came in on Tuesday and Anita was busy putting it away today, so maybe if you drop in early tomorrow before it gets too hot, you'll be able to find a cool spot in your home to craft.

My sister in law and I were busy today too, making tags for her son's wedding next year.  We made 100 decorated tags today and there were seven steps to each card!   Needless to say we developed quite a rythm by the time we were done.  I started with cutting 1/2" off the bottom of the tag, then stamped the tag with Hero Arts script stamp.  Now over to Di to stamp the tree and postage stamp (brought over from England). Back to me to stamp the word on the reverse side of the tag.  Now it's a unified effort as Di inked the edges of the tag front with Tim Holtz Distress Ink and the distressing tool and I inked the back the same way.  Job complete!
.
Here's a peek at what we were doing.  
      

How many scrubbed ones did we have you ask? 
We'll never tell until the scrapbook page is made. 

Lilian

Friday, July 15, 2011

Class Photos and a Shrink Plastic Jewellery Tutorial.

Hop on over to the Flickr site to see the cards we made at class tonight.  Bonus was that we found the stamp that we lost at last Technique Class. It was sitting on a low shelf where it had fallen and remained hidden.  Those pesky acrylic stamps are great until you drop them and they become invisible!

I found this tutorial when blog hopping one evening and saved it to share with you.  Jane from Milliemarvels Blog comes from a town in England close to where I originally came from.
This is a great craft to use some of those lovely stamps you own on.  We sell Shrink Plastic in the store and although Jane tells you here about using your heat gun, if you don't own one then you can use your oven instead.  It's great fun to see the change as the plastic shrinks.  Don't limit yourself in thinking it only works for jewellery, you can make some lovely charms for your scrapbook pages or cards too.

Mini Santa Shrink Plastic Earrings tutorial

  Materials needed:  Whiff of Joy Mini Stamp - Quiet Santa  
NOTE: You can use stamp of your choice here
White Shrink Plastic
Stazon or other alcohol based ink       
Colouring medium (Promarkers (Copics), Sakura pen)
Hole punch or cropodile           
Jewellry findings: jump rings, earring hooks, eyepins
Round nose pliers and wire cutters     Small pearls
Instructions:Stamp and colour the image on the rough side of the shrink plastic. The colours will intensify when the image is shrunk so take this into account when colouring in. I added Sakura glitter pen to the fur on Santa's hat and coat. If using Promarkers (Copics) try not to colour over the stamped lines or the ink will run.

Cut the image out and punch a hole          Shrink the image using a heat gun.   
in the top of Santa's hat.                        Use scissors or tweezers to hold the image
                                                                              to stop it blowing away       
     When completely shrunk, flatten with  acrylic block

 Use the pliers to open up a jump ring. Attach an eyepin to the jump ring and thread and fix to the top of Santa on two beads. Cut  pin and bend with the round nose pliers to form a loop. 
    
  Finish the earrings by attaching another jump ring and the
earring hooks.

I will definitely be making more of these before Christmas comes along. They are surprisingly quick to make and it would also be really easy to make phone charms or small badges using this technique.
I hope you will be inspired to give this a try.
Jane

Hope you enjoy this tutorial........Lilian

Thursday, July 14, 2011

Cleaning Lady and a Bonus

Just a quick little post this morning.  Cleaning's all done and we had time to play too.  Emily started by cooking us both breakfast, after all you work better when you're well fed.  Doesn't it look delicious. You can see how we both had different ingredients in our omelettes.  Fun and easy for a young cook.

Come back later today as I'm hoping to post a short tutorial I found on shrink plastic.
Lilian

Tuesday, July 12, 2011

Cleaning Day

Well tomorrow is cleaning day at my house in preparation for our company arriving, my cleaning service will be here around 9am.  Bet you all wish that you could access the same service I use!
She has her own transportation and will bring her own cleaning products if you want her to. 
We'll be taking a break around 1:15pm so that she can go to the program at the library and I'm going to the UPS Store Grand Re-Opening.  Buffy is really excited about the grand re-opening of her store after being put out of the building due to the fire at the Purple Pig more than a year ago. 
Anyway, here's the advertising photo taken two years ago of my cleaning service....contact me if you think you'd like to try her out!
By the way, the company I have coming wouldn't care if there was dust in my house, as long as my crafting room was accessible...LOL!
Lilian

Link To Our E-Newsletter!

     Are you wishing that you had had the chance to win our latest Blog Challenge?  Stay up-to-date with all the happenings in our store by subscribing to our E-Newsletter!  Click HERE for a direct link or visit our website at www.craftnookbracebridge.com to fill in your subscription.

All The Entries for Challenge # 3

Here they all are together for your crafting pleasure.......

1. Becky                                                                 2. Lynda


3. Bernice                                                                 4.  Bev

5. Carol                                                                 6. Becky
                           
7. Christine                                                                    8. Tara

10.  Yvonne                                                                       11. Carol 
12.  Madison                                                                            13.  Bev
14. Bernice                                                                      15. Tara
 
16. Becky                                                               17. Tammy

18. Diane                                                                                19. Madison


20. Martha                                                                 21 Tara
22. Bev                                                                         23. Tammy
                                 And the winner is ........................  

Random Integer Generator

Here are your random numbers:   

20

Timestamp: 2011-07-12 02:44:11 UTC
*******
This is Martha....Congratulations Martha
Drop into the store to pick up your prize.
****
Once again thank you to everyone for
playing along and sharing the fun with us
Lilian

Saturday, July 9, 2011

Lots More Participation for the Challenge - Are You In?


Stay with me on this post because it's long given that I took time out to smell the roses.  You'll find it worth the read if you do.

  Christine's entry makes good use of her scraps of patterned paper which she's assembled together as her focal point.  The colour of the border as well as both the card base and centrepoint anchor and complement the many colours of the central focal point.  The gem in the centre is a nice touch too. 

Now who would have thought these colours would be condusive to Hallowe'en?  Madison has nicely incorporated a Cuttlebug folder in the background to bring the fall flavour of Hallowe'en into this card.


Bernice's card makes you want to run and get your flip flops out and enjoy the sunshine.  This would be a lovely summer card to receive.

Diane has employed a number of techniques in her lovely card.  She's cut her focal piece out with an oval Spellbinders Nestability, but left the die on as she inked the edges with Tim Holtz Distress Inks.  She's also used a white pen to draw your eye to the scallops.  The border punch gives balance to the card and supports the birthday greeting.


Madison appears to have been inspired by her greeting and has die cut a number of birds to follow that theme.  I like the way the border punch was used to give the picket fence concept.


Carol has a lovely summer theme going here.  I love butterflies so this one sets my creative juices flowing.  Love the way the border punch became the trellis work for the flower to cling to.


Would you like to be the bride that receives this card?  What a fun theme Becky has used for a wedding card. 


Madison has put her challenge colours together well in this card.  The use of black to solidify and anchor the colours was very effective.


Bernice used her border punch well in this card as the background to her cottage scene.  You can almost smell the mountain air as you look at it!


Becky made a lovely shower/baby card ensemble for her interpretation of the blog challenge.  What a great card for a Mom-to-be or a new Mom.  Did you spot her border punch on the pocket trim?  How subtle was that.  It shows that you don't have to use much to folow the rules of the challenge.
Carol once again used butterflies as her theme with the focus more on the butterfly this time than on the vines it's resting on.  We see the same border punch, but now giving the illusion of a fence rather than a trellis.


We again have the Hallowe'en theme going on here.  (Can you tell a Mom and daughter were working on their challenges together...LOL).  Becky has used the Fall Cuttlebug folder in the background and then added some fun die cuts in front of the fence, with some scary stuff hanging down. A fun card.

Yvonne learned at one of our classes how to use the border punch to edge her card for a different effect.  Her subtle use of the colour yellow on both the edes of the card and for the body of the butterfly are very effective.

The design and creation of a card takes time to come to fruition particularly when there are many elements to it.  Lynda has used a number of different techniques in her card here.  From Cuttlebug to background stamping fill and the oh so slightly visible ribbon at the bottom giving another texture to this card.  Not to miss the interesting cut out of the birthday saying either.

Well I know this posting has been long, but hopefully well worth the read through with many elements to inspire you in your creativity too.
Don't forget that there's only a couple more days if you're wanting to enter this challenge.  It closes on Monday July 11th at 5:00pm.

Lilian

Friday, July 8, 2011

Taking Time to Smell the Roses

Well there are lots of entries to put on the blog for the latest challenge, but you know what I did instead?  I took time to stop and smell the roses.
My dear sister-in-law shared a photo with me of her roses,  it made me think of how you should sometimes get off the treadmill and take time out!  That's what I've done the last two nights instead of posting the entries last night I went at quarter to nine with the family for an ice cream cone.......ooohhh aaahhh...it was good.  The ice cream and the fellowship too.  Not to worry I thought, I'll get them posted tonight.
Well there's another saying...the best laid plans of mice and men oft times go astray.  Well they did tonight too, because my dear hubbie said...do you want to go for a walk....so we did.  Picked up two more stragglers on the way who came home for tea and another evening slips by.  Oh and I saw my niece had posted on facebook that the Canadian Mens Eight rowing team had placed third in Lucerne Switzerland, so naturally I had to do a little surfing to find my nephew's photo.  He's the coxwain in the boat and was in the last Olympics helping to bring home a gold for Canada in 2008.  He's hoping for another in 2012 and this is the journey he's on now.
HOWEVER....I digress.  Back to the posting.  It will FOR SURE be done tomorrow at the latest.  In the meantime...let me share the lovely roses with you and hopefully you'll take time to stop and smell them too.

Lilian