Have you been into the store lately? Linda and I have been busy making some sample crafts up for you to try by yourself for Christmas. As we were showing them to the croppers on Friday night, we kept being asked..."do you have a kit for that?"
End result is that we've put together some instructional kits at very moderate prices for you to purchase if you choose and then duplicate over and over.
There are also some samples here of crafts Linda has made for her girlie's Advent Boxes. Quite a challenge to figure out what to put in them given the size and not wanting to fill them all with chocolates. Linda shared a number of her ideas with another Mom at the Crop Night as she has three small children that she fills Advent Calendars for. Subsequently Jennifer went home with ideas and started kits for bookmarks and bracelets she will be making for her kiddies.
There's one sample of a painted and stamped wooden snowflake that I've made which is going to be added to a larger foam snowflake in the snowstorm at the cash register, (yes, we have the wood snowflakes in stock) Don't know about the snowstorm? I don't have a photo of that, so you'll have to drop into the store to see the storm we created inside on Friday to go with the storm that was waging outside.
I also have a couple of websites I want to direct you to. One is for some really great scrapbook layouts. The other for a free embroidery sampler design. Did you see Linda mentioned in the newsletter that we have some really nice assembled cross stitch kits in the store for just $2.99 that include all the floss, needle, fabric and frame that you need to complete the ornaments. Easy Peasy!
Here's the link for the scrapbook layout. I particularly liked
Sketch 151 here. I
liked the way in the first example
the two tags were interpreted as photos. You will see at the top right sidebar, you can choose layouts by the number of photos you have.
Who's going to make a layout from this sketch and email it to the store? Will it be you? I'll try and get one done this week, because next week I'll be in the city with family for a few days.

 Okay so here we go with some photos for you to enjoy and hopefully be inspired by
. This one Linda put together in miniature for the girls Advent boxes, but we also
have put this together for you as a kit. It's Mary, Joseph and baby Jesus. Shown in miniature on the left as a hanging ornmaent and
available in kit form on the right as a
standing ornament for just $5.00. Aren't they lovely and fitting as we remember the reason for the season.

For the Advent boxes and because her girls are such big readers, they will be getting more than one bookmark this season.
Here's a selection of what Linda has prepared for them in their appropriate colours.
Have you ever made a pom-pom from scratch? These in purple and green are simple to make, yet interesting to use. And the paperclips that became another style of bookmark.
And finally the angels here made from paperclips which we've also put together into kit form for you with instructions for just .50cents. Isn't that just the nicest little decoration that you could then make a box for (we've did that in class last week and will be again this week) and share with a friend without breaking the bank. 'Tis the season for sharing and giving.
Or how about
this lovely five point star. Cut simply from scrapbooking paper, scored appropriately, blinged and decorated with a final coat of podge to stiffen it. This too is in
kit form for just .50 cents. Can you
visualise many of these on your Christmas tree?
Linda made a stunning Christmas tree last week and although it took a little bit of time to cut out all the felt circles, the final result was well worth it don't you think?

This has been put into kit form including the styrofoam base, wood topper, pins, felt in the colour of your choice and the berries to embellish with. And the price for this beautiful tree table decoration kit is just $12.50.
We also between us made up this fun snowman ornament, though we haven't put it into kit form, we do stock the Dylite balls, pom poms and felt needed to make this cute trio. Look in the sock drawer for that lonely white sock and you've made up your own kit.
And as a reminder here are some of the samples that we created last Christmas and you may want to consider making.

An empty water bottle, sock, pom poms and felt make this easy no-melt snowman.

Or how about this trio of Santa hats. Made from three styrofoam forms, a little embossed foil, pom poms and felt a great craft to make with the children. Embellished with some gift bows at the base another lovely seasonal craft.
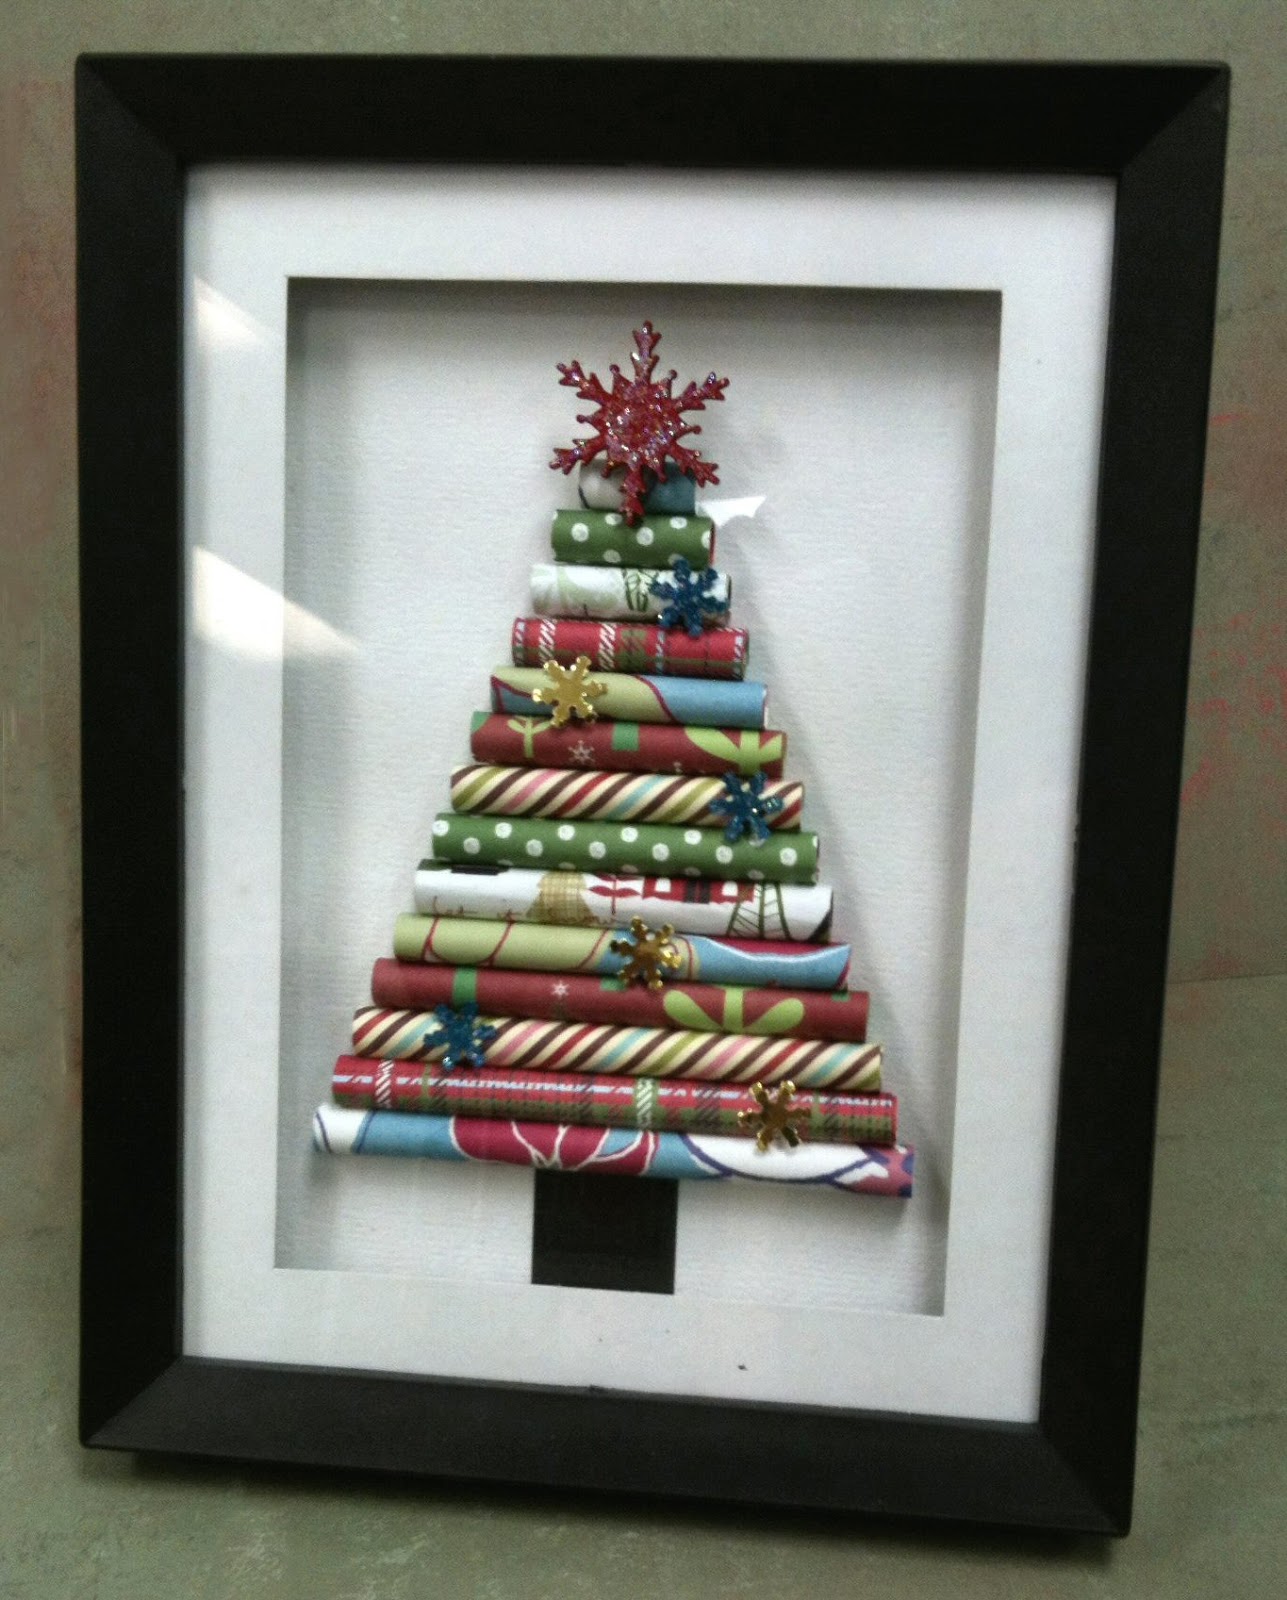
Do you remember the rolled paper Christmas tree that we made in class last year? There are so many pretty Christmas papers and this is a great way to show them off. Roll some of it around your pencil, cut to various lengths and glued onto a backing paper and you have created another lovely gift to give to someone, or keep yourself.

This was another tree from last year created with strips of reversible scrapbook paper and using short sequin pins, pinned to a styrofoam base, topped off with a silver bell. We lost count of how many of these were made last year, but if you didn't make one then, maybe you'd like to this year.
Here's the final craft from last year. (I did warn you it was going to be a long, but hopefully inspiring post). We made this in class and cutting letters from chipboard, gluing paper to the front and embellishing the large bell.

Chipboard and bells are in stock.
I mentioned earlier about the snowflake that will be hanging in the middle of our snowstorm so hang on while I take a photo.
Not the easiest task given the light reflection. Should have taken it in the daylight. However I'm sure you can get inspiration from this. Using a little paint, heat embossing a stamp and some Stickles or Twinkles on the top, this came together as a quick and easy craft.
Though we don't have the large foam snowflake in stock, it's been kicking around for years now, we do have the smaller wooden ones in stock. They'd look great in multiples on the tree too wouldn't they.
And last but not least
the promised website for the
free embroidery pattern is here. She's given some really clear directions to the cute and simple sampler. We
have some fabric in stock that I think would work
perfectly for this sampler as well as a
complete line of DMC floss and embroidery needles too. Have you wanted to try embroidery but didn't know where to start? We have some
new designs coming into the store any day now as well as
pre-stamped pillowcases and dresser scarves. Still unsure?
Then ask us about how to start. We both embroider, cross stitch and I have done crewel work as well. There's a sample up in the needlework section of the store.
So what was that, some twelve crafty ideas for you to work on. No reason to be bored if you visit your local Craft Store for inspiration and supplies. I'm going to have to dream up some new ideas for you next week too.
Did you miss coming to the Crop and Craft Night last week? There's only one more before Christmas and last week there were many, many gifts worked on, ideas exchanged, programs taught and learned or aspects of previously owned programs explored in greater depth. A great time and place to learn, laugh and have some fun with fellow crafters too.
Now I'm off to work on some more of my Christmas cards. Can't show you them as many of the family look at the blog too.
Are you remembering your Manna Food Bank donation through Kraft Foods...it's making a difference 50cents at a time we are up over one thousand dollars...can we make it three before the end of the year do you think?
Until later, Happy Crafting,
Lilian


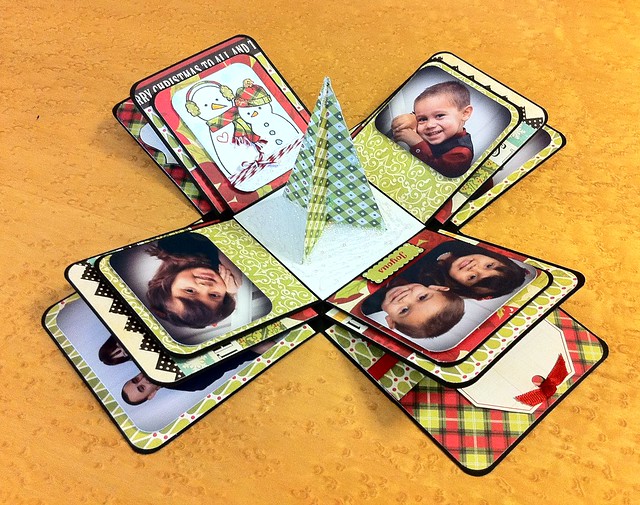 Rachel was busy at school today with her classmates making an explosion box and I believe Jonathan and his class will be making one later this week. I don't have a photo of what Rachel made today but we do have two samples in the store and here's another example I found.


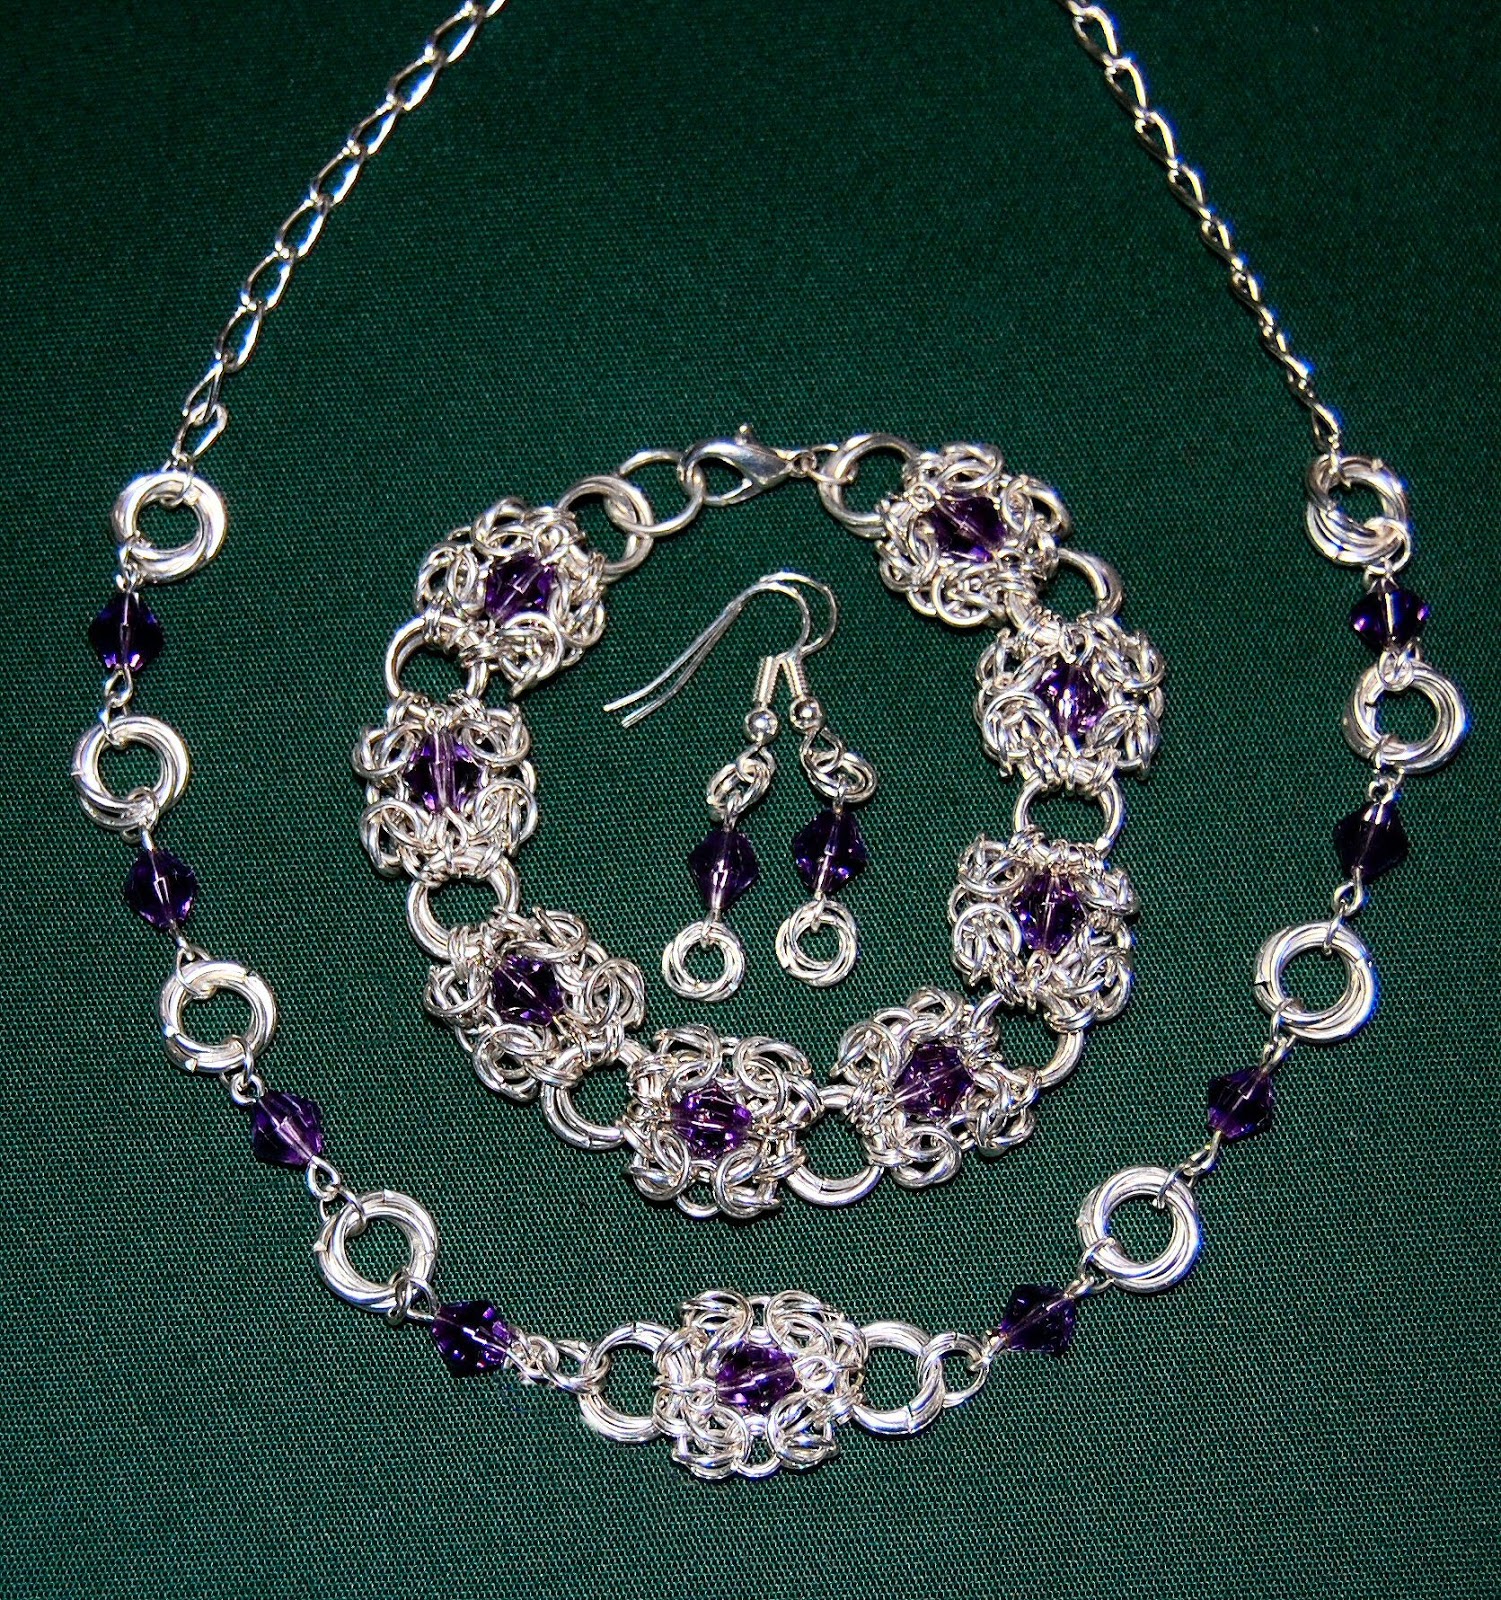

 Jump ring chain jewellery is something I like to make and though it's certainly not a quick gift, we do have a really good book in the store that teaches this style. Linda has it posted in the newsletter and if you mention that you saw this post on the blog, then you can purchase the book for 20% off regular retail price.
 I wanted to share a touching story with you and it's about my great-niece Brianna, shown here in this photo