Tuesday, November 26, 2013

Sharing My Space


Well I'm back to sharing my crafting space, albeit with another crafter, but when Rachel came for her sewing lesson tonight I thought she was moving in!  She arrived with a large tote full of "stuff".  


Being up to date with her crafting garbage bags and having finished her special orders as well, (you'll love what she's made for you Martha), Rachel is now on to creating something she's been planning for a long time.  
You have to know Rachel. She has a hard time parting with anything, therefore she has many t-shirts from her earlier years that she simply loves.  Her plan is to make these into a patchwork quilt, hence she arrived with all her "stuff".  We didn't get any sewing done tonight, but we refined the plan and cut the "favourite" pieces out of the shirts.  Next step will be to stabilize the fabrics and cut them to size.  I'll let you know how it goes as the process evolves.

Linda and I were both off this past Saturday so we took the opportunity of going to the craft sale at the Sports Complex in Bracebridge.  We saw many of you there along with lots of other people.  What a busy place it was with a swim meet going on at the same time.  Lots of happy vendors with the opportunity to sell their wares. It was lovely to see what many of our customers made with the product they buy at the Craft Nook.  

We had great fun last week at the second "gifty" class.  The ladies worked really hard, but still had to go home with some homework to complete the one project.  They loved the tea light tree they made from parchment paper.  The paper was first embossed with gold powder and then cut and scored to make the "tree" cover.  Topped off with a star it was a simple hostess gift.  The strip ornament was a great hit as well when the ladies realised how quickly that could be made for the unexpected gift.  The last but definitely most intense piece was the family birthdays board and to complete it required some work to be done at home. What a great gift for a grandparent so that they can remember all the family birthdays.

You can see all these pieces at the store, in the newsletter or later this week on the Flickr site.

This week we have a full class as we make six quick Christmas cards.  There always seems to be a card that comes from someone that you missed off your list, so learning how to create a fast card takes away the stress.  Next Thursday we will be making three more ornate cards.  A little more time consuming, but these cards will be a gift in themselves.  

I mentioned last week that we are going to try and give you a short tutorial on a different craft each week. This week we will show you how to make an easy desk calendar.  It's quick and easy enough that you could make a few and put them in your "gifting stash"

Supplies
1 piece of cardstock cut into three 4" wide strips
12 pcs patterned paper or cardstock @ 2 7/8 x 3 7/8 for month pages
 2 pcs of patterned paper for the front and back cover of the book @ 2 7/8 x 3 7/8 (if you choose to make  it book style)
12" narrow ribbon                           Various embellishments of choice
12 mats to fit your calendar             Calendar (business card size)   


 1- 12 x 12 cardstock 
Cut into three pieces 12 x 4 each


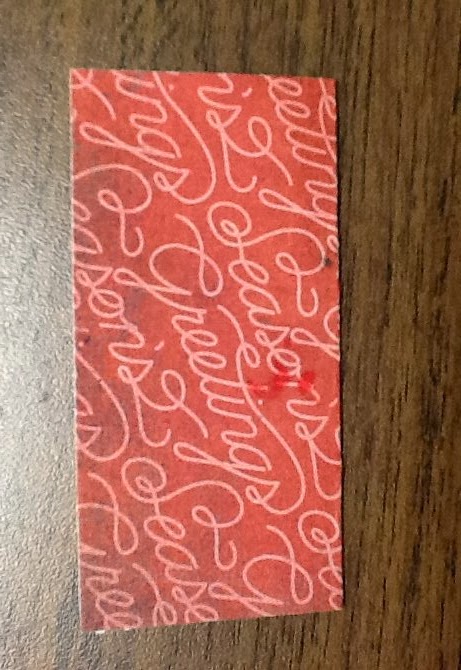
Score each strip at 3", 6", 9"


Glue one strip to the other as shown at the left to begin to form the pages

Continue in this way until all pages are made.

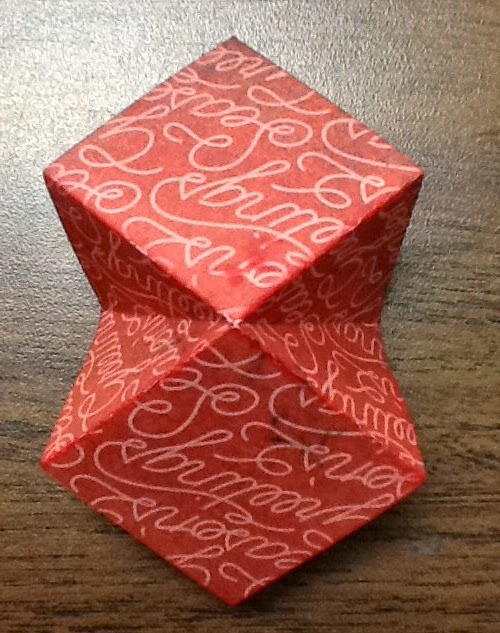
I didn't glue all pages together, but left an opening so that it formed a book shape.  You could choose to 
simply glue all sides to make complete star shape.


If you are making into book form, then proceed with the following

Glue ribbon onto one side of the front and back pages  and then glue covers over the ribbon.

I added a small non month related calendar to front as an embellishment.


Here you see how I embellished all the monthly pages.


Once all your pages are decorated and embellished to your liking, your calendar will look like this.

Looking down from the top, you can see where my calendar is tied at one side to hold it closed.


Here you see it standing on the desk in the open position.  The tie and opening are at the back.

Hope you have fun making this desk calendar.


As you're gearing up for Christmas may I suggest this to you......

One day at a time you'll be able to achieve
all your crafting goals.

For all the non paper crafters, here are a few links you may enjoy....

Some great FREE dishcloth patterns here

Or how about a quick felt pincushion or coaster here.

Perhaps by looking on Google images you could find a nice snowman pattern made from felt.  Just add a pin back (we have them at the store) and you have a cute little embellishment for your winter jacket. Or perhaps it's the felt Santa that we have on display in the store that you could make into a brooch.  So many choices....

Whatever your craft of choice.....


Until Later, Happy Crafting  

Lilian

Monday, November 18, 2013

Are You Any Closer?

I have to admit that I'm not...closer to checking names off my Christmas list that is.  We just celebrated two more birthdays in the last couple of days and still have two more to go before Christmas.  I have always had great difficulty thinking Christmas until the birthdays have past.  This has always created a problem inasmuch one of them is on December 19th!  Needless to say I have to get past my mindset and think Christmas.

We had a great time in class with the ladies as they created the three little gifts we had planned for them. Not only that, they each had a piece of birthday cake as Linda's husband and daughters came into class with birthday cake and a song to celebrate her birthday.  For a moment I wondered if we would be able to complete the three little gifts, but the ladies outdid themselves and everything was done by end of class. 

A great hit was the folded ornament that was introduced to us by Jennifer, a customer from Barrie area. It's such a simple ornament to make, but has a huge WOW factor.  Pauline who joined us in class was showing some of her co-workers and said the same thing...they were all "Wowed" by it's simplicity.  Linda ended up making another ornament so that we could offer you a picture tutorial below.  Hope you enjoy it!


There are many many good crafting ideas floating around in our heads, so we've decided to show you a different one each week that may just hit the spot for your gifting needs. Also if you drop into the store there will be others on display to get your creative juices flowing in time for the upcoming season.


 Christmas Ornament Tutorial:


Supplies:

5 - 3" square reversible patterned paper
2 - 1.5" square patterned paper
1 - large bead
1 - Piece of 1/8" ribbon approx 10" - 12" long
Glue Runner


Here in the first step you see where we stamped an outline image on the less colourful side of our reversible paper.

We then coloured the image with our green and red Identipen markers

If the paper you choose is colourful on both sides, you can skip these steps.


The next step is to lay the paper down on the table having the side that you want to be the outside touching the table.  We wanted the red to be the outside colour so our piece was laid red side down on the table and we then folded it horizontally as you see it.


Open that fold and fold again the opposite way (vertically).


Open the fold again.  Now turn your paper so that the pattern you want to be on the outside of your ornament (red for us) is now facing up from the table.  Then fold from one corner to the other once only.

as you see it here.


Flip your paper over so that the good side (red for us) is facing up.  Gently push the sides in so that you can fold this piece into a smaller square.
You are pushing on the diagonal fold that you made, and the horizontal and vertical ones (first and second fold) will pop up.
See the picture to the right


Do this with all five pieces and you will have five 1.5" squares now.


The next step is to glue them on top of one another with the closed points all the same way. 
Here you see a view of  the inside of two squares glued together with the open ends to the left and right and the closed end down in the middle.


You are then going to thread your bead onto the folded ribbon, tying a knot at the looped end so that it can't fall off.  The loose ends of the ribbon you will glue at the front and back of your stack of five squares as you see to the right.
You're almost finished now.  Just attach the 1.5" squares of patterned paper to the front and back of your stack to make covers and you're good to go.


Slip the bead down as you see it here to close the ornament. 
The magic happens when you push the bead up the ribbon, then twist the ornament covers to touch each other.
Now slip the bead back down and your ornament is open.

We went on to "dress" the ornament up with some gold stickles around the outer edges and on all the centre points too.
Here you see a side on view where we stamped the image.  To close your ornament, simply slide the bead up and close up the squares until your covers are again on the outside.  
Drop in to the store to see the sample we worked on in class and have a demo on how the opening and closing works.


I had never realised how in tune I was with Albert Einstein  until I read this quote of his the other day...LOL.


In class last week, we also made a candy box with a surprise as you opened it.  My niece sent me a a photo of some similar
ones she had made over the weekend.  Whereas ours were made matchbox style with the surprise pop-up.


Angela's were a sleeve over a package of gum that had a hole punched and ribbon tied through the hole to pull it out.  Two great quick ideas to give as fun gifts to co-workers or fellow students and all those people that you meet on a daily/weekly basis that you'd love to share a small gift with.


I mentioned earlier that there are many samples to look at in the store for inspiration.  We also have a number of quick kits at a very nominal cost such as this one.
With directions enclosed to make the whole craft easy peasy for you to do, it's another good idea to use on a gift or as a tree or mantle decoration.

If stitchery or paper crafting are not your cup of tea, how about another knitting pattern.  I really liked the look of these finger-less gloves, how about you?  Check out the pattern here.  They are worked on two needles and no thumb gusset or fingers to worry about. Quick and easy and made with a scarf to match would be an awesome gift.

Remember now what Albert Einstein had to say about creativity and intelligence...now go have fun.

Until Later....Happy Crafting


Lilian

Monday, November 11, 2013

Hey, Hey, Hey.....

Are you seeing the impending change in the weather?  Soon now we'll be saying Ho, Ho, Ho, won't we.

Are you ready for that?  I'm hearing via the family grapevine that one of my sisters-in-law in England not only has her gifts purchased, but wrapped as well as cards written out! 

Well I'm not there yet. Having just finished the fourth Christmas Card Day and with two gifty classes and two card classes to go before Christmas I know I have to begin thinking about it though if I want my cards to be in England before Christmas.


I'll be posting the Christmas cards from class on Flickr probably tomorrow now, but here's one  for you to see that we made in the meantime.  


I took the day off today except for Rachel's sewing class tonight.  If you missed out on her first wave of crafting bags, the next batch will be in the store later this week.  They're a great gift idea for yourself or a crafty friend.  Certainly saves picking all those little pieces up off the floor when you're sewing or crafting.


I had the pleasure of having one of my sisters stay over on the weekend and after card making for five hours during the day, we continued crafting until the wee small hours of Sunday morning too. Evelyn wanted place cards for her trailer clubs Christmas dinner, so we used this as inspiration for eighteen place cards. I can't show you the finished card as we only cut and stamped portions, Evelyn will finish them off when she gets home.

There are many ideas in the store if you're looking for a craft, whether it's a place card as Evelyn wanted, or perhaps you want to make your own Christmas cards or a small hostess gift.  Cheryl attended one of our Christmas Card Days and then taking the format of one of the cards she had made, she had her Sunday School class all make her "take" of that card.  Great card Cheryl.  Linda shared Cheryl's card on the newsletter so I'm sure you saw it there.


Kim was in on Friday and she wanted a small craft to do when she went to visit her Mom. After listening to her and looking around, we came up with this felt Santa.  
We traced off the face pattern and a quick phone photo (I think), some felt and a few beads she was set to go


My niece sent me some photos of scrapbook layouts she made whilst attending a fundraising crop where she lives in Belleville.  
I liked the simple blocking of this layout.  
By using squares and sizing her photos to 4 x 4 and 4 x 6, she created an interesting blocked layout.


Here's another layout she made this past weekend.  I told her that I'm in the middle of creating a page similar to this one. I'll show  it to you once I'm done.


Have you been scrapbooking lately?  

It's such a great way of recording your memories for not only yourself, but future generations as they will look at how our fashions and styles have changed over the years.


Maybe paper crafting isn't your forte? How about this lovely crocheted stool cover?

Worked in yarn for a quick project, you can find the pattern here.


Perhaps you prefer knitting, so how about these fingerless gloves to go on you Christmas crafting list.


Until Later....Happy Crafting

Lilian


Monday, November 4, 2013

The Bar Has Been Raised!

We told the ladies at Christmas Card Class #3 that some of the ladies at the second class were finished by 2 o'clock with just some colouring to do.  
Well the third class rose to the challenge and four of them were completely finished before 2 o'clock!  

I can't imagine what we might expect from the fourth class this Saturday.  

Linda and I had jokingly been saying that the fourth class may regret being in that class as we may be tired of teaching by then, but not so.  
We have had some lovely ladies in all three classes and everything has gone extremely smoothly, thus we've had lots of fun teaching.  

Nothing to fear if you're signed up for class number four, 
we're not burnt out.

We're well into the creating of samples for the next four classes now. See the dates in the newsletter.  In the two gifty classes the registrants will be making two to three quick hostess style crafts. Each class will have different crafts, so be sure to register for both.  There are so many people at Christmas that we want to recognise for the little kindnesses they show all year long, such as school secretaries, teachers, doctors, the cashier at the grocery store, the mailman/woman, the shut-in down the street.  The list could go on and on and these quick little crafts are an ideal way of saying thank you.

The third class will have you making five to six quick Christmas cards when you've realised that you aren't going to get those special ones done.  And then the fourth one will show you how to make two to three very ornate cards that are a gift in themselves.  Make sure you get registered early for each class as they will only happen once!

DSC09065
Have you registered for the gift tag swap yet?  This is your last chance to do so.  Pauline approached us about this as she can see the benefit of designing one gift tag and getting ten different ones back to her in the swap.  If like me you enjoy wrapping the gifts that you give, then a fancy and unique tag is an important part of the gift.  Linda has all the details, simple as they are, for you in this weeks newsletter. Don't delay, call us this week to get registered. Here's another idea for you if you're sitting on the fence wondering if you should participate.  Just type Christmas gift tag into Google images and there's a myriad of inspiration there.


This is the time of year when so many products and ideas are flowing. Scrapbook and Cards today has their new Planner/Calendar coming out soon and if you want to be sure to snag one, then get your name on the list before they come in. They're due into the store by about December the fourth.  That's a 64 page spiral bound planner/calendar with 30 page sketches for you to work from with more layouts created by the designers to inspire you.  

All this for only $12.99....
image
                 DO NOT MISS OUT ON THIS ONE!

For all the knitters in our midst I came across an amazing revelation this week on a blog.  They have a video that teaches you how to knit without turning your work!  After watching the video I realised I knew how to do it, but had never applied it as such.  It's a great idea to keep in your mind for when you are knitting short rows and well worth a few minutes of your time.  Bonus, they also have a number of interesting free knitting patterns you can download.


I was looking in my files the other day for some felt patterns and came across this door knob hanger that I've had a long time now. Although I don't have a cutting pattern for it, I think you could duplicate it with very little effort.  
Another great little Christmas gift idea.


Here's another idea that I made as a table favour for all the ladies at the recent Mega Crop.  With a little bit of felt, embroidery floss and some beads it makes a quick and easy tree decoration.
Drop into the store to see a sample of this Santa.


Did you get all your leaves raked up?  With all the rain this year, we found it a particular challenge, but I finished up the last the other day.  As I came into the house to make myself a cup of tea, I thought I'd check my emails first.
This is what I found in my inbox.............


I thought it was a great idea, so I sat with my cup of tea and read my book.


Until Later, Happy Crafting......

Lilian