I have to admit that I'm not...closer to checking names off my Christmas list that is. We just celebrated two more birthdays in the last couple of days and still have two more to go before Christmas. I have always had great difficulty thinking Christmas until the birthdays have past. This has always created a problem inasmuch one of them is on December 19th! Needless to say I have to get past my mindset and think Christmas.
We had a great time in class with the ladies as they created the three little gifts we had planned for them. Not only that, they each had a piece of birthday cake as Linda's husband and daughters came into class with birthday cake and a song to celebrate her birthday. For a moment I wondered if we would be able to complete the three little gifts, but the ladies outdid themselves and everything was done by end of class.
A great hit was the folded ornament that was introduced to us by Jennifer, a customer from Barrie area. It's such a simple ornament to make, but has a huge WOW factor. Pauline who joined us in class was showing some of her co-workers and said the same thing...they were all "Wowed" by it's simplicity. Linda ended up making another ornament so that we could offer you a picture tutorial below. Hope you enjoy it!
There are many many good crafting ideas floating around in our heads, so we've decided to show you a different one each week that may just hit the spot for your gifting needs. Also if you drop into the store there will be others on display to get your creative juices flowing in time for the upcoming season.
Christmas Ornament Tutorial:

Supplies:
5 - 3" square reversible patterned paper
2 - 1.5" square patterned paper
1 - large bead
1 - Piece of 1/8" ribbon approx 10" - 12" long
Glue Runner

Here in the first step you see where we stamped an outline image on the less colourful side of our reversible paper.
We then coloured the image with our green and red Identipen markers
If the paper you choose is colourful on both sides, you can skip these steps.

The next step is to lay the paper down on the table having the side that you want to be the outside touching the table. We wanted the red to be the outside colour so our piece was laid red side down on the table and we then folded it horizontally as you see it.
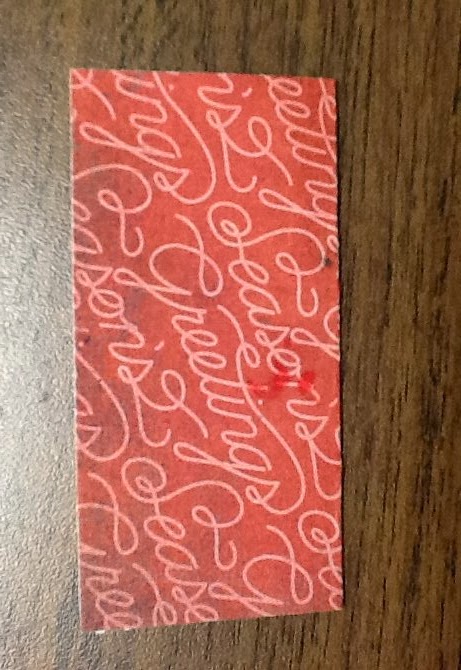
Open that fold and fold again the opposite way (vertically).
 Open the fold again. Now turn your paper so that the pattern you want to be on the outside of your ornament (red for us) is now facing up from the table. Then fold from one corner to the other once only.
as you see it here.
 Flip your paper over so that the good side (red for us) is facing up. Gently push the sides in so that you can fold this piece into a smaller square.
You are pushing on the diagonal fold that you made, and the horizontal and vertical ones (first and second fold) will pop up.
See the picture to the right
Do this with all five pieces and you will have five 1.5" squares now.

The next step is to glue them on top of one another with the closed points all the same way.
Here you see a view of the inside of two squares glued together with the open ends to the left and right and the closed end down in the middle.


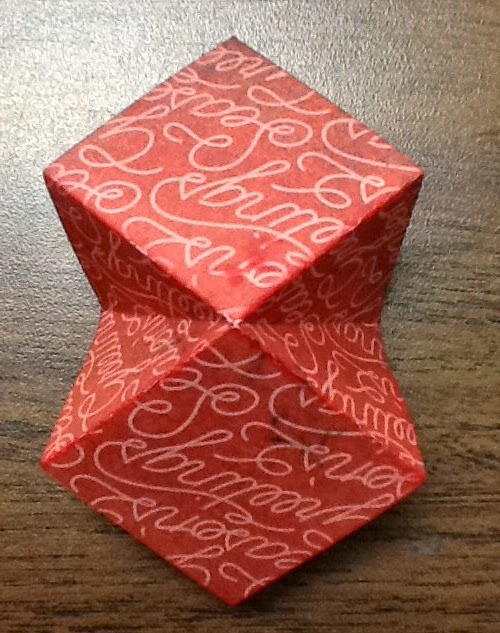
Slip the bead down as you see it here to close the ornament.
 The magic happens when you push the bead up the ribbon, then twist the ornament covers to touch each other.
 Now slip the bead back down and your ornament is open.
We went on to "dress" the ornament up with some gold stickles around the outer edges and on all the centre points too.
 Here you see a side on view where we stamped the image. To close your ornament, simply slide the bead up and close up the squares until your covers are again on the outside.
Drop in to the store to see the sample we worked on in class and have a demo on how the opening and closing works.
 I had never realised how in tune I was with Albert Einstein until I read this quote of his the other day...LOL.
 In class last week, we also made a candy box with a surprise as you opened it. My niece sent me a a photo of some similar
Angela's were a sleeve over a package of gum that had a hole punched and ribbon tied through the hole to pull it out. Two great quick ideas to give as fun gifts to co-workers or fellow students and all those people that you meet on a daily/weekly basis that you'd love to share a small gift with.
I mentioned earlier that there are many samples to look at in the store for inspiration. We also have a number of quick kits at a very nominal cost such as this one.

If stitchery or paper crafting are not your cup of tea, how about another knitting pattern. I really liked the look of these finger-less gloves, how about you? Check out the pattern here. They are worked on two needles and no thumb gusset or fingers to worry about. Quick and easy and made with a scarf to match would be an awesome gift.
Remember now what Albert Einstein had to say about creativity and intelligence...now go have fun.
Until Later....Happy Crafting
Lilian
No comments:
Post a Comment