Well did you get signed up for the Mega Crop Weekend? It was a slightly slower sign up on Thursday, but the early bird special still went pretty quickly with people signing up three and four at a time. We do have some space still so if you're on the fence trying to decide whether or not to come, don't delay, give us a call and get registered. We have one group of ladies coming from afar who are making a little party of it methinks. Hoping to stay in a motel unit together and enjoy some girly time.
Linda and I are always telling our scrapbookers to do some prep work before you come to a crop and you'll get the biggest bang for the buck that way.
Certainly Barb will attest to that as she has come into the store in the past with her file folders/bags, photos, possible embellishments, magazine layout or scrapbook map. She then chooses the papers for each layout and puts them into the folder/bag and she's good to go to turn out many a page over her weekend.
I was also talking to my niece who will be bringing her cousin for the first time to our weekend. Her cousin is a newbie with no clear plan as to where to start, but with a little preparation ahead of time, she too will get some good value from her weekend away.
I tripped over this article last week and it says exactly the same as what Linda and I have said from the second Mega Crop on, only this is visual and clearly shows a great way to get prepared for your weekend. Hopefully it will help some of the Mega Crop Weekend registrants. This is the article as per Elizabeth Wiederspohn.
How to Pack for a
Crop
 How do you get ready
for a scrapbooking crop? Do you pack your whole car up with supplies? Do you
page plan? Do you get frustrated that you don't get as much done at a crop?
How do you get ready
for a scrapbooking crop? Do you pack your whole car up with supplies? Do you
page plan? Do you get frustrated that you don't get as much done at a crop?We are excited to have 2010 Craft Warehouse Design Team member Elizabeth Wiederspohn, here to share with us how she prepares for a scrapbooking crop. This girl is so organized! We can all learn a tip or two!
Getting ready for a
crop is something that took me a really long time to wrap my mind around. The
first couple of times I brought two rolling suitcases with a bag over my
shoulder which was pretty much my entire scrapbooking supply collection just in
case I needed something. This drove me crazy not because of the mass amounts of
stuff I had to crawl through to find things but because when I got home, I had
to reorganize everything put everything away and much like my filing it never
got done. Plus I didn't get much done because I spent most my time trying to
figure out what I was doing and where to find things.
So after a few of these times not knowing where anything is and spending most my time organizing my stuff at the crops instead of scrapbooking I created a system. This system allows me to scrapbook mass pages during a crop and have to put away very little when I come home.
First of all I pack my basics bag (see photo above). This bag has the basic pens, cutting board, scissors, adhesive, ribbon, and tons of letter stickers in it.
Then I pack a bag of all my favorite embellishments. My current bag is a
Clinique giveaway. (On a long trip I might pack two of these bags.) When
finished this bag stays packed on my desk for me to pull from at any time.
Pulling embellishments from a small bag saves me tons of time on my layouts
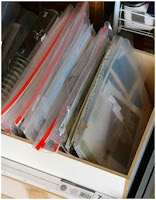
 Then I start on my photos. I take my memory cards in once a month to get
pictures printed. Immediately after getting them printed I place each event in
a 2.5 gallon resealable bag.
Then I start on my photos. I take my memory cards in once a month to get
pictures printed. Immediately after getting them printed I place each event in
a 2.5 gallon resealable bag.Then I place them in a Ikea storage cube until I am ready to make page kits. Sometimes I will have an idea or a piece of paper that really fits these pages right away and I slip those ideas and products in the bags before I even start making page kits.
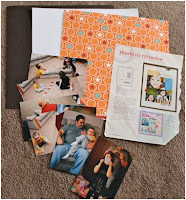
Next, when I run out of page kits or before a crop I do a mass taking over of my living room and layout all of the bags with photos in them.
I start in one corner and work my way down the lines filling each bag with an
idea from a magazine or printed online.
Then after all the bags have ideas I match the ideas and pictures with patterned
paper. Making sure to look at the idea I have and determining if I could use
scraps or if full sheets of paper are needed.
Then lastly I add my basic solid paper to all the bags.
 There is one more step but I rarely get to it and that is journaling. I try to
journal on all my pages and journaling is one of the hardest things to do at
the crop. So if I am very organized I will look through all my page kits and
write down the subject of each kit in a small notebook. I slip the notebook in
my purse and while waiting for appointments or during breaks at work I bring
out the notebook and pre-journal for the page. Then I bring the notebook with
me to the crop and I will have both journaling and titles for the pages ready
to go. Like I said rarely does this step get finished but I try and when I have
this done, that is when I can complete 10-15 pages in one night.
There is one more step but I rarely get to it and that is journaling. I try to
journal on all my pages and journaling is one of the hardest things to do at
the crop. So if I am very organized I will look through all my page kits and
write down the subject of each kit in a small notebook. I slip the notebook in
my purse and while waiting for appointments or during breaks at work I bring
out the notebook and pre-journal for the page. Then I bring the notebook with
me to the crop and I will have both journaling and titles for the pages ready
to go. Like I said rarely does this step get finished but I try and when I have
this done, that is when I can complete 10-15 pages in one night.So in all the only things in my page kits are photos, ideas from magazines or printed online, patterned paper, and solid paper. Now when I am ready to crop I grab a bag, some page kits, and my embellishment bag and I am ready to go.
On a short trip I can get away with just bringing my one bag and a cutting board. That is a big difference from the two rolling totes and and shoulder bags.
Well if you read this article through, you can see that Elizabeth pretty much covered very visually all that Linda and I have recommended so that you don't have to come with all your "stash".
Not only that, you don't have to spend another day after the weekend putting it all away again, knowing that once again you weren't as productive as you had hoped you'd be.
A really well put together article...kudos to Elizabeth Wiederspohn.
Our family was busy last week booking vacations for later this year, but also my hubby and I are jetting off to Britain to visit with family in a few short weeks. We have to be the most spontaneous people on this earth, but somehow it comes together with family willing to put us up, or put up with us, not sure which. My dear mother-in-law will be celebrating her ninetieth birthday later this year and when talking to her yesterday she sounded really excited to be seeing us soon. We'll enjoy some touristy stuff with family and a few Pub dinners for my hubby whilst we're there.
So crafty wise what are you all up to? I've been busy again on my cross stitch, spending hours working at it then looking to see how much I've done and it looks minuscule.
That's when I count the stitches to make myself feel better about it LOL.
I found a great website for embroidery stitches if you like doing that.
We had an impromptu class last week in the store for Mary who was struggling with french knots sliding to the back of her needlework. She sat and stitched a number of them after I showed her how I do them and went home feeling quite confident that she would be able to do them on her own.
I've been embroidering on some felt the last couple of days and enjoying the change. Here's some idea of what I've been doing. I can't show you mine as some will be for hostess gifts when we are visiting Britain.


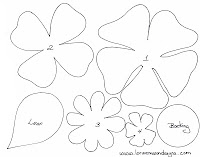
I came upon this pattern for felt flowers by Lorine Mason. I couldn't find them on her blog, she had them posted on someone else's blog. The other examples I Googled images and found them so you would have to do the same and go to the appropriate website/blog for instructions.
I found this example of embroidery stitches through images with no-one to credit. If you need more instruction we have some excellent embroidery booklets in the store too.
Well I hope it wasn't too long a post, but I also hope that I inspired you to try something new. If you're not sure on any craft, drop into the store and we'll see if we can help you along with it.
Until Later....Happy Crafting
Lilian
Happy Birthday to my sister-in-law on Saturday.


No comments:
Post a Comment