That's a question we are often asked by both new and seasoned Scrapbookers, so I thought I'd share with you the steps I go through to prepare and then create a page.
I remember when I first began scrapbooking some twelve years ago and the style then was to take your photos to the paper and choose those that went with the photos. Then place the photos in a "Z" shape across the pages. I quickly got bored with that and realised that all my pages were looking the same except for different papers.
The next step for me was to realise that when I knit or sew, I always have a pattern to follow and with my choice of materials my garments looked unique. With that realisation in hand I began to follow designs from magazines and my pages took on a different look, but photos tended to be same sizes or cut/cropped so that I lost the content of my photo.
A giant window opened for me when I discovered Becky Fleck's Page Maps. She is an amazing graphic designer and by using her "maps", every single page is so unique, so many different sized photos, so many ideas on how to make the best use of your paper.....I love it! However I'm not saying it's only her designs I use now, but she opened the window for me.
So here's where I start. I choose the design and then I like to take it into my photo program to perhaps manipulate it a little to suit me better. This is my starting map/point. When you see the finished page, you will see this is simply a jumping off spot for me.
My next step once I've chosen my photos is to take them into the layout. This gives me a good feel for the placement of the chosen photos.
By this time the photos are sized to fit my layout and I prepare them to send to be printed.
Because they are varying sizes, I often put more than one into a 4 x 6 photo, such as this one. Both of these photos fit into one 4x6, so are printed as one photo at the lab with a white background around them. I simply have to cut around them to separate them. This is not only cost effective, but has allowed me to reduce the size of the photo without removing the content which is what happens when you crop it.
These steps so far will have taken me less time than deciding which photos to use. Once I've separated all the photos and chosen the paper I'm using, it takes little time to actually put the page together. When choosing my papers, because I use a number of different papers to a layout, I have no trouble making the colours work with my photos.
So now here's the finished layout. It's a little different to the original map, with embellishments placed in other areas, but as I said, a map is a jumping off spot for me. I was quite pleased with the finished result. Using a photo (at the bottom) for my title was a change and the flower embellishments this time were cut from paper, mounted on punched circles and covered with Glossy Accents to give them the dimensional look of an epoxy embellishment.
Hope this has been helpful for you and maybe caused you to look at the prep work of a layout a little differently too. If you have any questions, please get in touch and I'll do my best to answer them.
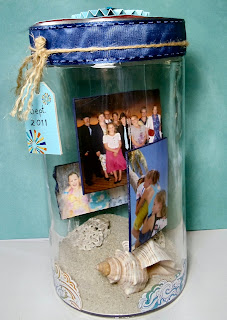
 Now one more thing to perhaps inspire you before I go. This is another way to display some photos in a memorable way The photos are displayed a jar that have sand and shells from one of the beaches we enjoyed when on our cruise last year.
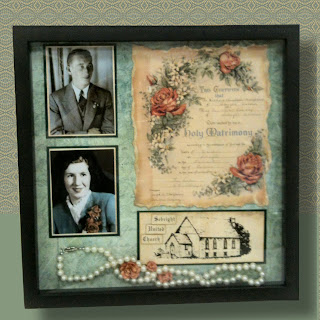
  And here, Brenda has displayed her parents wedding photos and marriage certificate in a shadow box. This takes on a very personal touch when you notice the pearls draped along the bottom of the photo. They belonged to her mother and were worn on her wedding day. Another lovely way of displaying photos that have a very special meaning to you.
So I hope you're inspired to preserve your memories in one of the three ways shown above. As I said, if you need help then drop into the store for a quick answer, or why not sign up for one of our Craft and Crop Nights, (we have one tomorrow). That's when Brenda comes to get some help with her projects. and did I mention she won first place with one of her scrapbook pages at our last crop weekend? Not this frame, that was completed quite recently, but another beautiful heritage scrapbook page.
I notice that presently we only have one person interested in joining us for a card swap. I know it's summer and a hot one at that, but surely like me, some of you are still crafting? If you're sitting on the fence not knowing how to participate, please don't hesitate to get in touch, or scroll down to the July 17th entry and sign up in the comment section.
Until later, Happy Crafting
Lilian


Thanks LIllian. That is an awesome way to start. I think I may try it myself.
ReplyDeleteJane
I'm sure you won't be disappointed Jane. It is so much better than having to cut photo's to the size needed. You can crop them on the computer (or expand them) knowing when you get them back from printing they are going to fit onto your page without the need to cut and risk the subject effect being lost. It also saves me time in the long run by there being far less head scratching and pondering!! I can see the impact it will have on my computer. I look forward to seeing your next page.
ReplyDeleteDi
When you say your photo program, you mean like adobe or another similar one right? I have adobe and corel photo, would they work. But how do you know the size, does the program tell you the size of the picture you need?
ReplyDeleteYes that's what I meant by photo program Jane. I use Paint Shop Pro which is made by Corel. I have a dear sister-in-law that took the time to teach the program to me and I use it in so many ways. The photo of Brenda's frame (posted above) was taken on the table in the store with all the Cuttlebug folders behind it. You don't see them now, because I took the frame out of the photo and placed it on another mat using the Paint Shop Pro program. I'm sure that either of your programs would do the same job for you. Bring your laptop with you one Friday Night Crop and Craft and we can take a look together. As Di said, you won't be disappointed and you will print your photos in the sizes you want, rather than having them all 4 x 6 and cutting parts off to get them to size.
ReplyDeleteLilian