Tuesday, January 14, 2014

Wow, That Was Quite the Weather Change Wasn't It?

My sister in law in England is in an area affected by all those floods, though their home is fine. She did say to me when I was showing her all the snow we were getting a week or so ago...at least you can shovel the snow, we can't do that with all the rain.  How true that was, as we found out over the weekend, when our snow turned to rain.

Still I don't think we are suffering as they are in some areas of  England and Wales.  The Bed & Breakfast where we stayed in  Aberystwyth, Wales in April of last year was being battered severely by the waves from Cardigan Bay.  We sat in the bay window of the house in the evening enjoying a cup of tea, but I think a week ago we would have got pretty wet sitting there. Bearing in mind that these are century old homes and not all windows had been replaced.
Here's a You tube video of the area we stayed.  We were in the houses facing you in the distance, about midway and we walked along the promenade where all the waves are battering.

Well ladies I think you will be getting the shortened version  of the blog tonight as it seems in installing a program on my PC, I've made it sick.  I am typing this on my iPad which in itself is fine, but most of my files are on my PC!

Are you joining us this Friday night January 17th for the Crop and Craft night?  I think we may have a knitter or two then as well.  
Speaking of knitting, whilst it was quiet on Friday afternoon of last week, I tried my skill at arm knitting.  Have you tried it yet, it's very popular right now.  I don't think I'll ever be an arm knitter and it was kind of funny as I became a little tangled in the yarn at one point, but I was able to knit up a chunky scarf in about 30 minutes.  You use two strands of a #6 yarn, (we have more coming in at the end of the week), but in the meantime I used one strand of a #6 and two strands of a #5.  A little more complex, but worked just fine as you can see below.
Join us on Friday though and enjoy learning a new craft or completing a UFO.  Yes I know you have them, we all do.  Unfinished Objects are the bane of a crafter's life, because we often pop onto the next thing before the first is finished.
Our other challenge is when we have a creative block and so the craft sits unfinished. That's whats nice about a Friday night Crop & Craft, someone else always has an idea that gets you out of the block.
Don't forget that if you complete one older page from your Basic Gray Page of the Month kits, you'll get the evening at half price.  Make this the year for catching up UFO's.
I  have been very neglectful in sharing a photo that one of our crafters sent us before Christmas so I made myself a special note to make sure I showed you this week.  Candice was very busy making 52 of these trees as table favours for her golfing group.  What do you think...pretty amazing in my opinion.  Thanks so much for sharing Candice.

I'm not sure if Candice hand cut all these trees, or if she cut them on a digital cutter like the Silhouette Cameo. Certainly would have made faster work than hand cutting.  
Do you have a Cameo?  Linda has some very attractive pricing on the two Silhouette machines at the moment so if youre thinking of one, this is the time! 
If you don't know all the lovely things you can create with them, take a moment and drop into the store to ask us about them. 
Remember how Emily cut some fabric out with my Cameo for her Christmas gift.  You can also cut out heat transfer material to iron onto aprons, tee shirts, or vinyl to have word art on the walls or in frames.  Just about anything your mind can dream up, the Silhouette Cameo or Portrait can cut out. 
Of course they're invaluable when you scrapbook or make cards, and you don't have to buy cartridges!  Not only can you purchase just the embellishment you'd like for your project, you can easily make your own.  It doesn't stop there either, because any True Type font on your computer can be cut with this machine.  A great addition to your crafting supplies.

Here are some great ideas to help you with the journaling on your scrapbook pages....

Make a List.    This is a fairly simple journaling technique that is suitable for use with any type of page theme, for example:
Doing a friendship page – list how you met, where you met, how long you have known each other, include what you like about your friend and why you are both pals.
If you're doing a recipe scrapbook page – then make a personal top 10 list of reasons why you like Grandmas chocolate cake so much.  This is very pertinent to my sister's family as they figured out Grammies fudge recipe recently.
Doing a baby layout – do a list of baby’s favorite foods, you can even do one for the foods they don't like!  
A variation of this listing technique is to use bullet points to mark each line on your list, giving you an opportunity to emphasize each item of your journaling.  Another bonus with using the list technique is that you do not need to worry about the structure of your sentences or that your journaling makes sense because the list breaks down what you want to say into its basic readable form.  This technique is also called strip journaling, when your short sentences are printed on narrow strips of cardstock or patterned paper.  Drop into the store to see some examples.
Write a Letter.   This is one of those great scrapbook journaling ideas that’s fairly simple to do and its also a lovely, personal way to journal your layouts too.   All you have to do is pretend you’re writing to a friend telling them what is happening in your photographs.  I often say to our scrapbookers, pretend I am standing behind you are you're explaining to me the content of your page. Sent any emails lately? Like letters, emails are also a good source of journaling material that you can use for your layouts.  I've recently been creating some pages using photos I picked up from Facebook.  I used the various posted comments as my journaling, printing the Facebook logo beside the comments.   If you are unsure of your own journaling then doing it in a letter format could help your writing flow more easily, as you describe the people and the events taking place, letting you tell the story naturally and in your own words.
If you are one of those people who find it difficult to begin the journaling process these fun scrapbook journaling ideas will provide you with some basic tips and techniques to help make it easier.  So go on, try out the scrapbook journaling ideas above for yourself and add some stress-free journaling to your pages.  Once you have finished you will see that its been well worth the effort. 
Well for all that I didn't have all the files I wanted to share, I didn't do so bad with content after all.   I was planning on sharing the Minion Slipper pattern that Linda knitted, but that will be something for you to look forward to another week.
I do have to share this lovely photo of Emily though, our frugal shopper.  For a number of years now, my Mother-in-law has sent her great grandchildren a monetary gift for Christmas.  I began the tradition of putting a gift certificate on the tree when they were younger, with the promise of a shopping trip with Great Nanna's money and lunch with me.  It became a special time they looked forward to. Here you see Emily on her shopping trip, writing in her book what she was purchasing so that she wouldn't overspend.  Amazing how much she was able to purchase with her gift money. Lunch is always at the restaurant of their choice, this time it was the Hong Kong Buffet.
And the words for this week are for all those people who are struggling to lose the extra pounds from Christmas eating.....
Until Later, Happy Crafting
Lilian

Tuesday, January 7, 2014

Well a New Year Has Started.

Are you the kind of person that makes resolutions?  I never do, simply because I know I am not of the nature to adhere to them.  I wouldn't be able to stop smoking (thank goodness I never started) or adhere to a diet, I just don't have willpower I guess is what I'm saying.

I was chatting with a sister in law today and she was telling me what she does to fill her days or relieve herself if she's stressed.  Can you imagine...she spends time in the kitchen baking or cooking!  Not me, you'd find me in my craft room creating something or other. How about you, how do you chill out?  (Poor choice of words with the deep freeze we're in again).

Today I was asked by a family member to create a document for them but in agreeing to it, I knew it would cause me to rise to a personal challenge. I would have to learn how to create a PDF document.   I was unaware that with the publishing program that I like to use when creating documents or journaling for my scrapbook pages, I could create a PDF document and therefore it really wasn't a great challenge after all.   No idea what that (PFD) stands for by the way, so I have to go and look it up now.  It's a Portable Document Format...now aren't you pleased to have learned that?  The nice thing about a PDF document is that it's a format that can be read no matter (I think) whether the recipient has the same program the document was made in.  I see possibilities in the future. 

We had a few people email the store last week about the double handed mittens, the infinity scarf and the bag organizer so will try to address those queries.


To Sue regarding the bag organizer.  

Rachel didn't really have a pattern to go by Sue.  On Google images we found a picture. From that she created her own pattern just by measuring Linda's tote bag and deciding how many pockets she wanted in the organizer.  Rachel knew she wanted pockets for Linda's order book, pen and for her phone. Once she knew the width and depth that would fit the bag, she simply cut material accordingly. For the bindings, she cut straight strips measuring two inches wide by the necessary length.  She then pressed the fabric in half to make one inch width, opened it and pressed the raw edges into the fold line making a binding, repressed on the first fold line.  The corners she mitered to make a neat turn. The straps were sewn on after the organizer was complete and they go around the straps on Linda's tote and button back onto the top of the organizer.  Linda was very pleased with the finished result and how her iPad fits in behind the back pocket too.  Why don't you drop into the store sometime and Linda will be happy to show it to you Sue.

Margaret, you were asking about the infinity scarf I knitted for Sandra's gift.  

Linda and I were out shopping for gifts for Sandra before Christmas when I saw a lovely scarf that spoke to me about Sandra.  I knew I could make her one that would have greater meaning to her than a bought one. 
We looked at the scarf in the store and determined it was about 72" x 12" and all worked in stocking stitch. It was fine yarn and very soft, so I chose a baby weight fine yarn.  The scarf we saw was loosely knit, so I chose to use very large needles for this, 10 mm needles in fact. 

You have to know me and know that I don't like to knit on circular needles. My knitting style is to have one needle tucked under my right arm and you can't do that with circular needles. Hence that meant my infinity scarf would be knitted in a long piece and joined on the narrow edge. 
You recall I said that it needed to be 12" wide, so I cast on stitches to that approximate width, for me it was about 50 stitches if I recall correctly. Can you tell this wasn't a precise garment?  Knitting in stocking stitch (one row knit, one row purl) caused the scarf to roll slightly on the outer edges adding to the very soft overall look.  

I had knitted partway in when I thought ...wow this would be nice if I added some small pearl seed beads to it for sparkle (a little hard to see in the photo, but they're there).  I did this, not by adding all the beads at the beginning of the work and drawing them into the work as I needed them (remember I had already begun this project when I got my "brilliant" idea), but by using a sewing needle and thread.  What you do is put your sewing needle through the bead, then through the working stitch you want the bead to go on, then back through the bead gently drawing the knitted stitch through the bead. With this method (we've shown card makers how to thread a ribbon through a small hole in this same manner) you don't have to know how many beads to add to your yarn before you begin your project.  I did however have to go back and hand sew the section that I had worked before I got my light bulb moment.

Once my piece was the length I wanted it to be, 72" in this case, I picked up and worked in the stitches from the cast on row and the row I was knitting and cast them off together.  To cover my seam, I first gathered it in and then knitted a narrow piece, about 6 stitches wide and four inches long sewing that over the gathered seam.
The finishing touch was the crocheted flower with pearl embellishments in the centre and a pin back finding on the back.  I've had that pattern for eons, so have  no idea where it came from. It's worked like this and I'll put it on a tutorial page for future reference.

Crochet Flower…4 layers of petals
I used a 4.5 mm crochet hook

Ch 5. Sl st in 1st ch to make a ring or make magic ring
Round 1:  Ch 1. (SC, ch 3) 5 times in ring. Join with a sl st to 1st ch made at the start of this rnd
Round 2:  Ch 1, (SC, 5 DC, SC) in each ch-3 sp around. Join with a sl st to the 1st ch made at the start of this rnd
Round 3: Ch 1. Working behind the petals made in Rnd 2, (SC in next ch-3 sp of Rnd 1, ch 5) around. Join with a sl st to the 1st ch made at the start of this rnd
Round 4: Ch 1, (SC, 9 DC, SC) in ch-5 sp around. Join with a sl st to the 1st ch made at the start of this rnd. Join with a sl st to the 1st ch made at the start of this rnd
Round 5: Ch 1. Working behind petals made in Rnd 4, (SC in next ch-3 sp of Rnd 1, ch 7) around. Join with a sl st to the 1st ch made at the start of this rnd
Round 6: Ch 1, (SC, 13 DC, SC) in ch-7 sp around. Join with a sl st to the 1st ch made at the start of this rnd
Round 7: Ch 1. Working behind petals made in Rnd 6, (SC in next ch-3 sp of Rnd 1, ch 9) around. Join with a sl st to the 1st ch made at the start of this rnd
Round 8: Ch1. (SC, 17 DC, SC) in ch-9 sp around. Join with a sl st to the 1st ch made at the start of this rnd
Fasten Off.   

I then sewed pearl beads at the base of each petal and one in the centre. There's one on display in the store if you'd like to see it.  I also added a pin back to it so it can be easily taken off and put back onto the scarf.


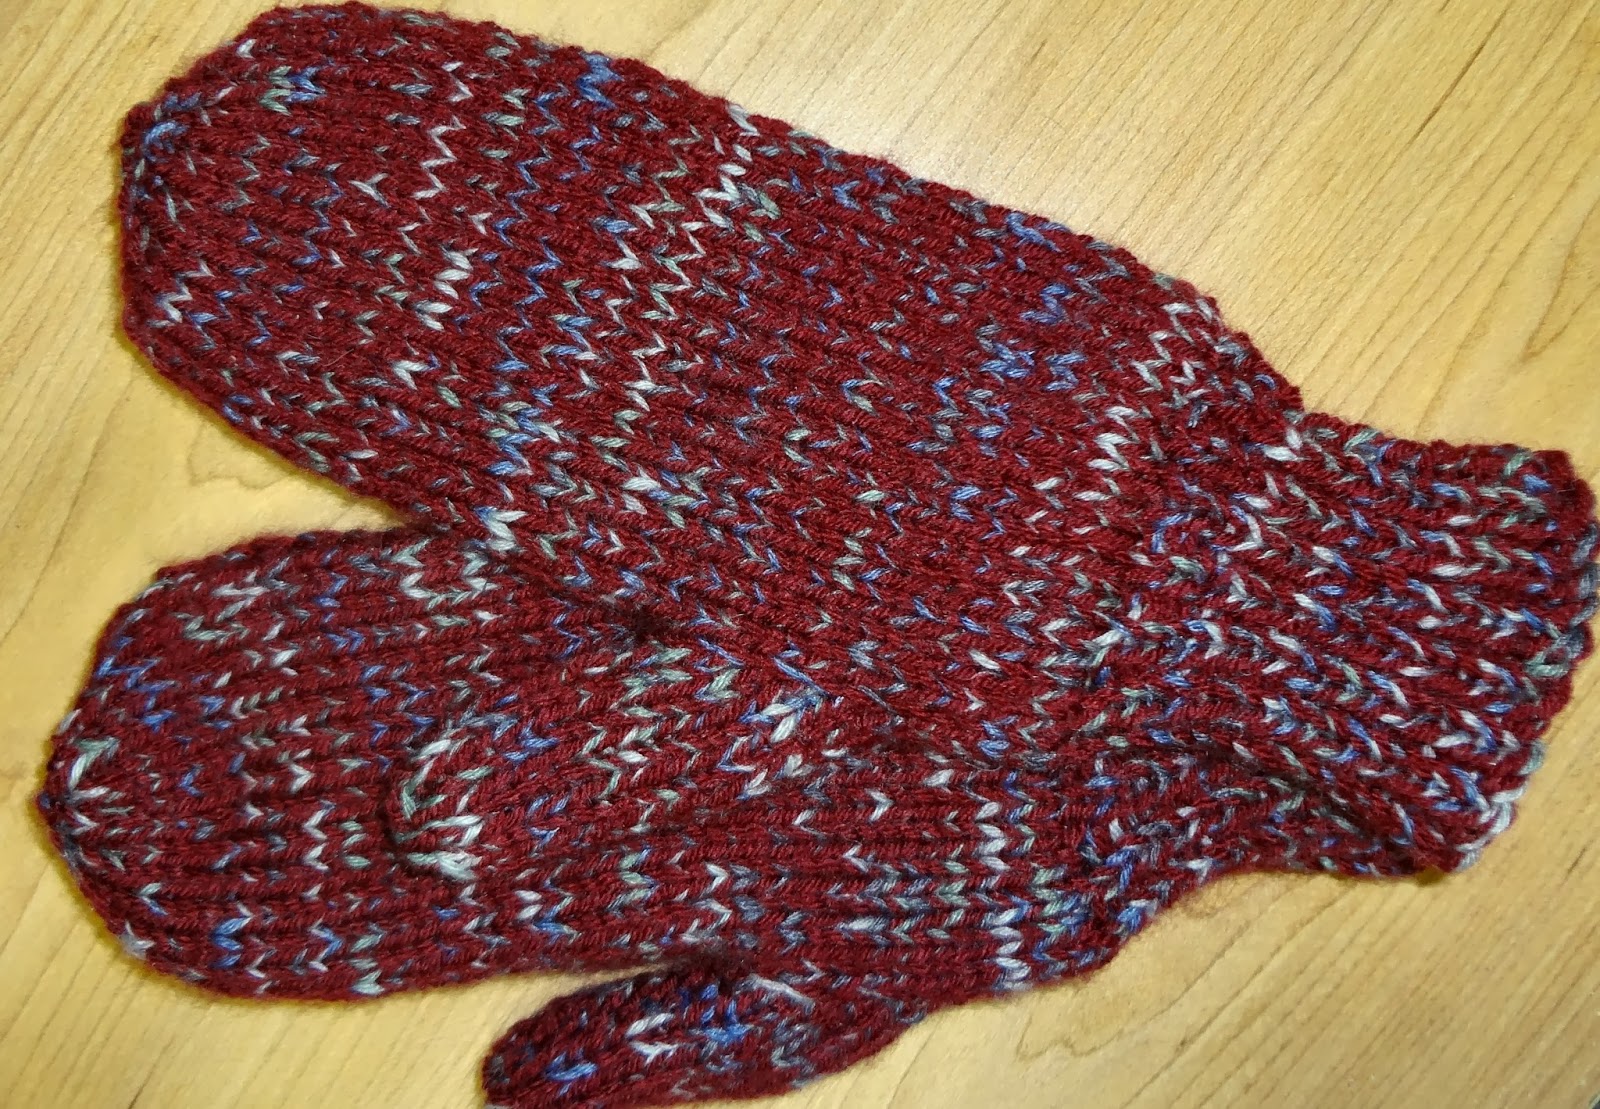
For all of you that were interested and intrigued by the double hand mittens. I've made zillions of these for my daughters and their friends when they were all little.  I say zillions because they all had three or four pair as they were so thick that when they got wet playing in the snow, they took some time to dry.

The simplicity of them is that you simply knit up the one mitt, then from the inside of the mitt at the top of the rib you pick up the stitches and knit a lining mitt only.  

What I chose to do with these was to use a double knitting weight yarn as well as a sock weight yarn, knitting them together.  
In these mittens of Linda's  I used a burgundy double knitting weight and a variegated sock yarn. The reason I do this is that the sock yarn has some wool content which gives the mittens greater warmth (ask Emily and Linda about that for confirmation).  
So if you have a favourite mitten pattern then try doing this yourself.  Feel free to drop into the store for greater clarification should you need it.  I'll be happy to give you an impromptu knitting lesson as I did our customer Sandra the other day.
I'll type out the basic pattern (no lining) that I've used forever and place it on a tutorial page for future reference.

I know Linda expects that I will be putting the Minion Slipper Pattern on this week, but I will add that next week.

I had the pleasure of a visit with one of my sister's recently and she mentioned to me that she wasn't able, didn't know how, to post a comment on the blog.  She's no longer a favourite sister as she said this in front of Linda who has been telling me the same thing for ages!  It seemed easy to me (no doubt as making a PDF document seems to some, but not me until today), so I didn't take heed or address the concern. However once Evelyn mentioned this, I not only showed her how to do it, (she posted a comment on the tutorial page for the Christmas Ornament, go take a look), but I also resolved to be a little clearer for everyone.  

So here goes. If you receive the blog in your inbox each week because you've signed up to receive any changes to the blog, you will have to click on the title in your blog email which will then take you directly to the blog.  This blog today is titled, "Well a New Year Has Started".  Last week was "The End of Another Year".


Once you are at the blog, then you scroll down to the bottom, below where I sign off and you see some thumbnail pictures of previous postings. Below that you will see a brown bar, see the photo to the right, that says posted by Craft Nook at whatever time I posted...(don't look too closely or you may see what time I am up) then it may show No Comments or it may have a number in there of comments already made.  


Just click on the comment wording and it will bring up a comment box like this to the left here.  
All you have to do then is type your comment into the box, including your name in the comment box so we know who you are. 
Below the comment box you will see "Comment as" with Craft Nook in there, but there's a drop down arrow to the right where you can choose how you will comment.  
In most cases I expect that "anonymous" is the choice you will make, unless you have a blog of your own or some other type of address. Once you choose "anonymous" (don't forget to have signed your name in the comment box), simply press publish and you're done.  We'd love to hear from you if only to tell us what you're up to, so don't be shy, please leave a comment or two on what catches your interest or what you are doing to "chill out".
Marta sent us a lovely email telling us what she had done with the tags she received  in the Christmas Tag Swap she participated in.  I'll try and remember to copy it into the comments so that you can all see what good use she put them to.  I can be so totally inspired by some of the ways our customers craft that I love to share these ideas with all of you.

I know this was a long blogging and I hope you were able to stay with me, because I  have another story to share with you.   

I mentioned to you a while ago how Emily had wanted to learn to sew on the sewing machine.  She has a small crafting sewing machine that used to belong to her sister Jessica at one time. Emily was so determined that she planned out, with Linda's help, how to make a gym bag for herself.  
When she was at my house one day she showed me her fabric and told me of her plan.  It was obvious to me that she had thought this out well, but the fabric she had available to her was not a good size for her plan.
So off we went into my fabric stash...oh the joy on her face to be allowed to choose from the "stash". After looking through a variety of colours and textures, she chose the appropriate fabric for the job and off we went to the sewing machine.  

More joy when she found she was going to use the "big" machine. She listened well, she measured, she cut, she sewed and here's the final result of her very first sewing project. One where she planned the pattern and executed the plan.   She was going to embellish it further, but to date has chosen not to.

And finally, (though I'm not really finished, I'll have to save it for next time, or maybe I'll put an extra blog into the week) my words for today...I  have so many!!  

We all know that any form of crafting be it needle arts, paper arts of any sort, painting, or general crafting is an art form, so with that in mind, remember that.......especially all you Canadians...


Until Later....Happy Crafting

Lilian


Monday, December 30, 2013

The End of Another Year


Is this how you felt when Christmas Day was done?

I hope Christmas for all of you was everything you would have wanted it to be.


The gifts that the girls made for each other and their Mom and Dad were received with much pleasure.  Time was taken to explain why they were chosen and the challenges faced as they were each made.

Here's what they accomplished...


Rachel made this garment bag for her Dad and particularly liked the fact the she designed it with a heart that had an "R" cut out of the middle which could stand either for her or her Dad (Randy).  
The words were cut on the Silhouette Cameo using heat transfer material.


For Emily, Rachel made a chair organizer designed to hang over the side of her desk chair. You have to know that Emily is always organizing her "stuff" so this was the perfect gift for her.  It can double as an under the mattress organizer should she be sick in bed anytime. There are multiple pockets on both sides  for pens, books whatever she may like to put into it.


For her Mom, Rachel made an organizer for the tote bag she carries her "stuff" to work in. It too has multiple pockets to hold pens, her book she uses for ordering product at the store, cell phone and such.


Here you see the organizer on it's own with the book, pen and cell phone in it.  
There's another small pocket and a large back pocket as well to hold other things as she chooses.


And here it is inside Linda's tote bag.


Emily made a dust cover to protect her Mom's Silhouette Cameo here. She said this was pretty easy to sew up and Mommy certainly liked it.


Another dust cover was made by Emily, but this time for Rachel's sewing machine.  She said this was hard to sew around the curves at each end.  The embellishments were cut out of fabric on the Silhouette Cameo and using Heat Bond, ironed onto the cover.
So as you can see both girls were busy sewing their gifts before Christmas and only one needle broken!

Did you manage to get all your crafty things ready for Christmas.  I managed a pair of double thickness mitts, some money that I origami folded into a shirt and pants for Jonathan who wanted to go shopping for some new clothes and an infinity scarf with flower embellishment.  
We had many people still dropping into the store at the last minute for items to complete their gifts.


And now as one year ends and another begins, does it cause you to look back and remember not just the challenges that may have come your way, but all the small things we should be thankful for.  


I came upon this on Google images today and thought it would be a good thing to do, and even once a month to look back on it and use as inspiration for a scrapbook page or two.  

What do you think?


Did you see in the newsletter that registration is open for Basic Grey Page of the Month and Card of the Month too?  They are great programs providing you with supplies to get a handle on either your scrapbooking or card making. 
We've found the value for money in these programs to be really good, so if you haven't tried it, then why not make this the year that you do.  
Have you participated in the past and fallen behind? Then bring your kits along to the Crop and Craft Nights on Friday nights and let us help you to jump ahead....nothing's easier or more fun than creating with friends.


So now as we move into a New Year, make yourself some resolutions. 
Register for the Card Classes at the Craft Nook, come out to the Crop and Craft Night and learn a new craft.  Maybe you'd like to knit some Minion slippers like Linda did, or perhaps not a character pair, but something plainer.  

Whatever you want to learn, choose to be a little craftier in 2014 than you were in 2013.


I visited my favourite blog for words the other day and found these words for you.


Until Later....Happy Crafting

Lilian
Tuesday, December 24, 2013

It's Here...Ready or Not, Christmas Has Arrived...


Well almost anyway.  

Are you ready, did you think of one more perfect little gift to make or buy? It's been a bit of a scramble the past week, but I think I will be able to say...I'm done.

I watched Emily do a little dance when she heard a weather forecast saying that there would be snow on Christmas Day....perfect weather for Christmas she said.


Are you like us with family on other continents?  We have a lot of family in England as you all know, but we have many family members in Australia too.  Their time is sixteen hours ahead of ours, so they will be celebrating Christmas Day far ahead of us.  England is just five hours ahead of us, so as we are going to bed, they will be thinking about getting up.


Christmas gifts graphics
Rachel and Emily were here today putting the final touches on their gifts and wrapping them ready for to put under the tree. Choosing the wrapping paper, ribbon and bows are all important parts of their gifts and done with great thought and care.

After listening to the news tonight, I was thinking of the people who won't be able to be home for Christmas. 
Sometimes because of distance or perhaps weather conditions. Carefully made plans gone awry.
The turkeys that may not be cooked in Toronto because of the ice storm and power outages.  
The hydro workers who may be out in the field working to restore the power to thousands of people.  


It makes me more aware of how we should all treasure the time we are able to spend together as family. 
For those that don't make it home for Christmas, remember to celebrate it together another time.


Linda and I have enjoyed a year of crafting with many customer friends at the store. The laughter and sharing that takes place is second to none.  We look forward to seeing them again after the Christmas break and the start of new classes. 


merry christmas for my love Romantic Merry Christmas 2013 Wishes for Boyfriend

From all of our family that have had the pleasure of serving you in a variety of ways this past year at the Craft Nook, we  wish you a...............


Lilian and Linda

Monday, December 16, 2013

That Was a Bit Much Don't You Think?

Not being a winter person to begin with, Wednesday and Thursday weren't on the top of my wish list, how about yours?  If you thought driving was bad on Wednesday, Thursday exceeded itself didn't it.  
And today...what was with those temperatures?  I mentioned to a sister-in-law in England that this morning it was -31 Celsius with the wind chill factor. 

She said..... 
MINUS 31 !!!!!  We got to Minus 16 a couple of years ago and thought that was bad enough....and it was only one night !!  

These English, no stamina have they...oops forgot I was one once...though I still have no stamina for the extreme cold.  


So how's your Christmas list coming along.  I have a little more to make and I'm there, pretty pleased with myself because I've had a hard time this year with ideas.  Often there's one on your list that challenges you, but this time it seemed to be everyone.


Have you been into the store to see 
the new quick crafts we have displayed?  


Last week we made a quick pipe cleaner tree that the little ones can handle easily.  
Or a pom pom snowman, another quick craft for the younger ones.  

They will be great crafts to keep their hands busy next week when school is out, so don't delay in popping in to pick up your supplies for them.
 

We also made a topper for a bottle of wine if you are thinking of gifting some wine for Christmas or taking it with you to a party, this is a great way to present it.  

A simple rectangle of felt, a couple of stitches and you're just about done. Attach two layers of felt for the beard and a pom pom for a nose, topped off with another pom pom on his conical hat and you are done!


I'm always looking for input on the blog to make it better for you, easier to maneuver or more interesting.  Last week we received a comment from Lynn asking if we could put all the tutorials in one place to make them easier to find at a later date.  
WELL! 
I looked at that and thought, oh dear, I'm a crafter not a techie, how do I accomplish that.  That was my response to Lynn too, but I told her I would give it a try.  
After some muddling around and trial and error, I got it figured out.  So now you will see on the right sidebar a subtitle called Pages. Under that subtitle you will see all the tutorials that I've put in the December blogs.  
Hope you're as pleased about it as both Lynn and I were. You can see our comments at the bottom of this blog entry here

Tutorial - Itsy Bitsy Multi Coloured Scarf from leftover Yarn

Scarves continue to be popular whether they are cowls or neck warmers, dressy scarves over sweaters, or scarves designed to keep you warm.
The one I'm going to show you now not only will keep you warm as a neck warmer would, but uses up some of those short ends of leftover yarn you have in your yarn stash.

I began with a part ball of chunky yarn that was multi coloured, but any weight will work for this as well as a solid colour.  If it's thinner, then put two strands together to work the scarf base.  I used 8 mm needles, but again that's not overly important.  (See how easy this is to make.)  Your goal is to knit a piece that is approximately 26-30 inches wide by about 6 inches long. 
I found that casting on 50 stitches (this is the long edge) worked for me and then I simply knitted in garter stitch (every row knitted) until my work was 6 inches long.


Once that was achieved the fun part began.  I pulled out many different small balls of yarn in different textures and weights (thicknesses).   


Cutting the yarn into strands of different lengths I began to loop the strands into the scarf on the short ends, travelling up about 8 inches from each end, which left the piece that goes around the back of the neck without additional yarn. 


None of these measurements are critical, it's a fun scarf and the measurements are only to be used as guidelines.

And here's the finished scarf.  You could choose to sew a button closure at the neck, or just as I did, tie it in a loose knot at the neck.

By using multi colours and textures of yarn, this would be a warm scarf and could be worn with any coat or jacket. 


Hope you try making one for yourself.

Buy Jigsaw Pom Pom Scarf Online at johnlewis.com

Remember a very plain knitted scarf can be dressed up by using different textures as this one was, or by adding an interesting fringe, or even mini pom poms on the edge. Thanks to June for that idea.
Don't know how to make pom poms?  We have pom pom makers at the store.


For other knitting and crochet ideas try looking at this website sent to me by my sister in England.

  That's a good question.
I'm fortunate enough to have not only two sisters, but three sisters-in-law.  Most of them are crafters, sewers, crocheters or knitters and offer me good input for the blog.
Maybe you are as fortunate as me.  Not a sister perhaps, but a sister-in-law that you enjoy sharing your crafting love with.  If  you have  neither, then why not find a friend that shares your love and craft with them. When the new year begins, then register for one of the classes at the store, we'll look forward to seeing you there together.

Until Later....Happy Crafting

Lilian


Tuesday, December 10, 2013

Getting To Look a Lot Like Christmas...

With the snow on the ground and so many outdoor lights in town, it definitely is looking like Christmas.  
I put my tree up today and decorated around the house, all I have to do now is complete my shopping.  Emily's been helpful by giving us her Christmas wishlist.  
Have you emailed your list into the store so that we can help your personal Santa with their shopping for you?  Much as we know you all well, we can't remember what tools etc. that you have or hope for.  Be it a Silhouette, Cuttlebug, some dies, stamps, Cropadile or a variety of crafting supplies.  It's really easy to fix though.  

From your newsletter Linda has provided you with a link that takes you to a wishlist with many suggestions and open spaces for those things we didn't think of for you. So don't delay go and fill it out now.  If you're not sure what you'd like, why not send your Santa in to buy a gift card for you. That way you can come in after Christmas and shop until your gift card runs out.

What a lovely time the "girls" in our family had on the Bracebridge Christmas House Tour and how generous are the homeowners who open their homes to assist the Hospital Auxiliary in their fund raising.  
They were anticipating approximately 400 people going through the homes in the few hours on Saturday. I enjoy being able to view both the older homes that have been renovated back to their original state as much as possible, the newer homes that are decorated for the season, but enjoy too meeting up with old friends that we haven't seen in a while.  If you haven't taken the opportunity of the tour in the past, keep it in mind for another year.                   
Help your hospital and enjoy the tour too.

Easy Luminary Tutorial

How's your Christmas crafting coming along? Here's another quick idea for that last minute gift for an acquaintance or friend.  Inexpensive and quick to create, it works perfectly for many people.
We created in class a lovely parchment luminary with star on the top and a box to hold the battery operated candle.  This luminary is a simple and quick cone of parchment paper that can be decorated or left plain.  I chose to use my stylus to create a white on white pattern all over my cone.

For this craft you will need 
one piece of 8.5" x 12" parchment paper which we carry at the store.
If you choose to create an overall design then you will need a stylus and soft mat below the parchment.


Below is the cone shape to cut out of the parchment paper.  I've drawn it to display five different sizes so you can have a grouping of luminaries. 
 Print both of these patterns, overlap and match the writing to create the one pattern.  Note it won't print out on one piece of computer paper as that's only 8.5" x 11". The largest size of luminary requires 8.5" x 12".

You may have to enlarge the pattern to size it correctly.  
The side with the dotted lines should be 7.5".  
The solid line side should be 7.25".
If you have any difficulty with this, drop into the store and we'll help you.


Having cut out and sized the paper pattern, transfer the outer lines to your parchment paper at the height you want.  Remember I said there are 5 different sizes, you cut according to the height you want your luminary to be.  

It's at this point that you could either stamp a design of your choice on the parchment paper and maybe even heat emboss it, or as I did using my stylus and soft mat beneath, I transferred my design choice onto the parchment. Here's the design I found and used. I needed to move it around the cone to get the coverage I wanted, turning it to fit nicely together.  
When using your stylus, take care not to press too hard or you will pierce the parchment.  To get the white lines, I simply went over the design first and then enhanced the lines by pressing a little more firmly the second time. This took me about ten minutes, so far the whole craft has taken about 15 minutes. You are now ready to place double sided tape along the dotted line on the one side of the cone. Take care as you join the two sides to line them up well so that the bottom is even and the top is nicely tucked together. Place your battery operated candle on a table, place the luminary over the top and that's it, you're done.  Now you may want to repeat the process and make a grouping of luminaries.


Here's my finished luminary.  To take this photo, I simply sat it into a wreath and placed some pine cones around the luminary.  If you made more than one luminary, it would make a nice grouping on a table or counter top with a buffet spread.
Hope you enjoy making one or two of these very quick crafts.

Did you see the beautiful embroidery work that Linda created on felt? The photo just doesn't do it justice at all and you should take a moment to see it in the store if you can. When she showed it to me on Sunday I thought it was such a shame to only have the opportunity to look at it at Christmas time. Today it occurred to me how lovely it would be worked onto a sweater or fleece top.  I'll have to suggest that to her. The beads make such a lovely sparkle on the tree and she said it didn't take her very long to stitch.  It could be worked on a larger piece of felt or fabric and framed too...so many options.

I often wonder what I can put in the blog that may be of interest to our readers.  Without feedback from you I don't know if the content is of interest or not. 
Do you like what you read here?  
Do the links and suggestions that I offer interest you?   There are some comments that come back to me from customers coming into the store, but not many, so still I wonder. 

Last week we received an email from Marta asking me why I hadn't put the quote of the week in last week's blog.   Quite honestly, it was because I hadn't heard from anyone that they were interested in words as they interest me, so I decided to omit them.  

This blog is for you, about what is hopefully one of your favourite crafts, but I don't presume to know what content will be of great interest to you, so would be happy to have your input in the comments at the end of the blog.  It's very easy to do.  

If you look below this blog entry where I sign off, there are usually a few photos from previous blogs. Below that is a tan coloured block and to the right edge it will say "No comments"  click there to your comments.  There are a number of choices as to how you may post, but you will likely want to use the "Anonymous" option, but PLEASE sign your name in your comment box so that I know who you are. 
If there's anything you would like me to add to the blog, let me know there and I will do my best to accommodate you.  I'll look forward to your feedback.

So here you are Marta, words for this week.  I think most of you will feel the same way I do about this, particularly at this time of year............


Until Later....Happy Crafting

Lilian